Improved point cloud experience
Starting from Tekla Structures 2025, you can access, process, manage, and share large point cloud files stored in the Trimble Reality Capture platform service. Tekla Structures 2025 also introduces improvements in the point cloud performance and usability.
Attach point clouds hosted in Trimble Connect - Integration with Trimble Reality Capture
Using the Trimble Reality Capture platform service, you can attach point clouds hosted in an existing Trimble Connect project without having to store large point cloud files locally on your computer. Using point clouds directly from the cloud improves collaboration and project accuracy.
When you need to access a point cloud, you can quickly turn it on in Tekla Structures and use it.
Trimble Reality Capture platform service license is required for the point cloud provider (surveyor or other scanner owner) to store and share the scan data: Streaming point clouds from Trimble Reality Capture platform service does not require a separate license. The license is required for the point cloud provider to store and share the scan data in the Trimble Reality Capture Platform Service. Trimble Connect users can use the Trimble Reality Capture platform service by just toggling the button in the Trimble Connect User Interface to access it. They will get 10 gigabytes as free storage so it's easy to trial and if they need more storage beyond that they can purchase a license.
To learn more about the service, see Trimble Reality Capture.
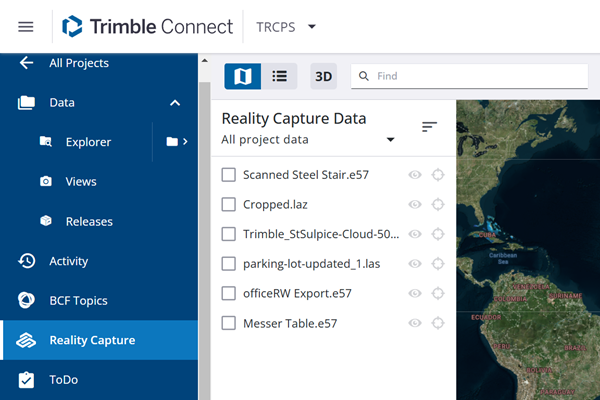
Point clouds in Trimble Connect:
Changes in Attach point cloud dialog
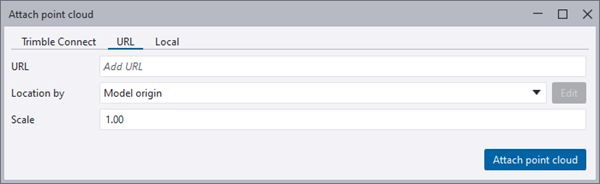
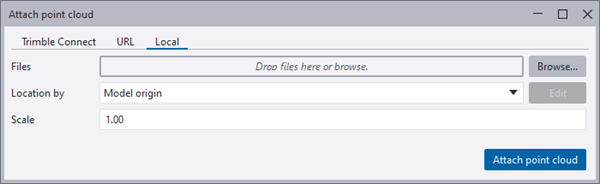
The Attach point cloud dialog has been changed so that attaching point clouds hosted in a Trimble Connect project, attaching point clouds from web, and attaching point clouds locally now have tabs of their own: Trimble Connect, URL, and Local.
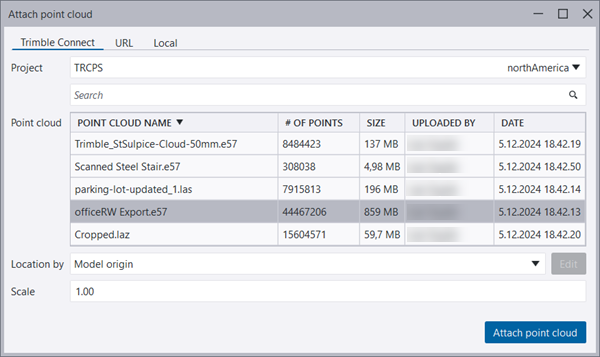
Attach point clouds hosted in aTrimble Connect project:
Attach point clouds from web:
Attach point clouds locally:
Attach a point cloud from a Trimble Connect project
- In the Tekla Structures side pane, click the
 Point clouds button and click Attach. In the Attach point cloud dialog, on the Trimble Connect tab, select a Trimble Connect project. A loading spinner
  is displayed while the
point clouds for the selected project are being loaded. Select a point cloud
hosted in the Trimble Connect project, and click Attach point cloud.
is displayed while the
point clouds for the selected project are being loaded. Select a point cloud
hosted in the Trimble Connect project, and click Attach point cloud. - You can browse to any Trimble Connect project that has point clouds in the service without needing to do anything specific in the Tekla Structures model. You can also search for point clouds in the Attach point cloud dialog.
- Once the point cloud is attached, you can show the point cloud in the model
by selecting the model view where you want to show it and clicking the eye
button
 next to the
point cloud in the side pane, just like earlier.
next to the
point cloud in the side pane, just like earlier. - Once the point cloud is attached, it will no longer be available for attaching again in the Attach point cloud dialog.
Better point cloud performance and usability
Enhanced performance
You can now zoom, pan, and rotate models with large local point cloud files much faster than before. This improvement makes it easier to use point clouds for creating models, pulling dimensions, and checking for clashes.
Improved usability
You can now more easily isolate areas of interest in point clouds using the new Clip box feature on the Clipping menu on the View ribbon tab. To create clip boxes only to reference model objects and point clouds, go to and select the checkbox. This command is also available in Quick Launch.
For details about the clipping tools, see Create clip planes and clip boxes.