New clip boxes - focus on point clouds, reference model details and model details in the model views
With the new clip boxes in Tekla Structures 2025, you can isolate a specific area within a model by hiding the rest of the model.
Clip boxes enable you to focus on the required detail in the model, without the need to create multiple clip planes. You can isolate an area of the model for closer inspection with one click. You can create one clip box per one model view.
With clip boxes, you can either
- create a clip box around a larger area of the model by picking a point in the model. The default size of a clip box is 5000 x 5000 x 5000 mm.
- create a clip box around a selected object in the model.
Additionally, you can now create clip planes and clip boxes only to reference model objects and point clouds by selecting the Clip only reference objects checkbox in , or find the command in Quick Launch. When selected, the native Tekla Structures objects are not clipped. When the checkbox is cleared, clip planes and clip boxes in all views clip all objects.
This new Clip only reference objects option replaces the previously used advanced option XS_DO_NOT_CLIP_NATIVE_OBJECTS_WITH_CLIP_PLANE.
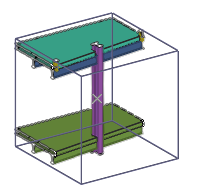
Create a clip box around a picked point
- On the View tab, click , or find the command in Quick Launch.
- In the model, pick the center point for the clip box.
The clip box is created. The axis of the clip box follows the work plane.
- To change the position of the clip box, pick a new center point for the clip box.
- To finish creating a clip box, press Esc.
- To adjust the clip box size, select the clip box.
The direct modification handles appear to the clip box.
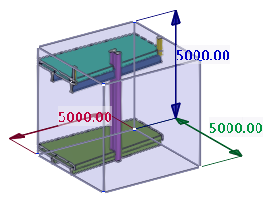
- Drag any of the handles, or modify the dimension values.
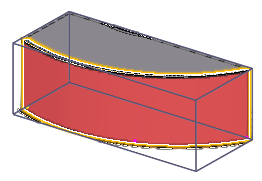
Create a clip box around a selected object
In addition to the default sized clip box, you can create a clip box around a selected part, assembly, bolt, reinforcement, reference model, reference object, or buildings or spaces in building hierarchy. The clip box then contains only the selected object.
- In the model, select the object you want to create the clip box around.
- Right-click and select Create clip box.
The clip box is created around the selected object. The orientation of the clip box follows the coordinate system of the selected object.
- To adjust the clip box size, select the clip box.
The direct modification handles appear to the clip box.
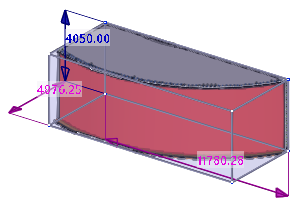
- Drag any of the handles, or modify the dimension values.