Create clip planes and clip boxes
Clip planes and clip boxes enable you to focus on specific details in the model by isolating parts of the model for detailed examination.
With clip planes you can see inside the model by clipping out a part of the view. You can either create clip planes by selecting an object face, or create clip planes that are based on the view depth.
With clip boxes you can isolate a specific area within a model by hiding the rest of the model.
Note that you cannot create clip planes to a view which already has a clip box in it.
Create a clip plane
You can create up to six clip planes in each model view.
To create clip planes or clip boxes only to reference model objects and point clouds, select the Clip only reference objects checkbox in . When selected, the native Tekla Structures objects are not clipped. When the checkbox is cleared, clip planes and clip boxes in all views clip all objects.
-
Move the mouse pointer over
the model objects.
A cross symbol indicates the object faces and planes that you can select and align the clip plane with. The line symbol indicates the side that will be clipped out. For example:
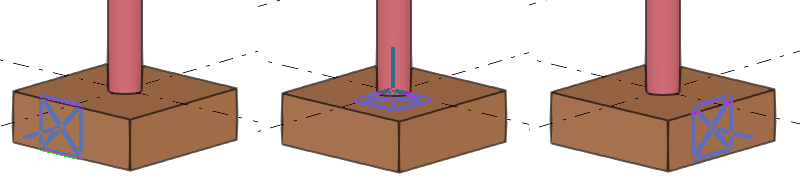
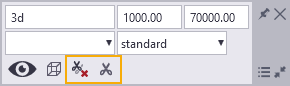
Note that the snap depth setting on the Snapping toolbar affects the object faces you can select. Set snap depth to 3D or Auto to select object faces in the entire 3D space.
-
Select an
object face.
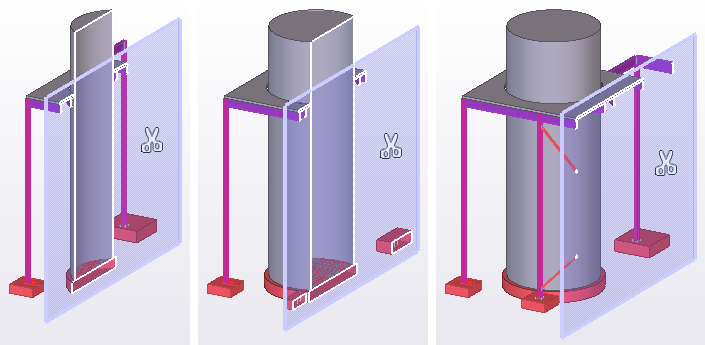
The clip plane symbol appears in the model
 .
. -
To move a clip plane, select
the clip plane scissor symbol and drag it to a new location.
Create a clip box
Clip boxes enable you to focus on the required detail in the model, without the need to create multiple clip planes. You can isolate an area of the model for closer inspection with one click. You can create one clip box per one model view.
With clip boxes, you can either
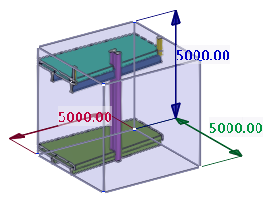
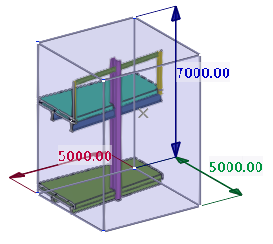
- create a clip box around a larger area of the model. The default size of a clip box is 5000 x 5000 x 5000 mm.
- create a clip box around a selected object in the model.
To create clip planes or clip boxes only to reference model objects and point clouds, select the Clip only reference objects checkbox in . When selected, the native Tekla Structures objects are not clipped. When the checkbox is cleared, clip planes and clip boxes in all views clip all objects.
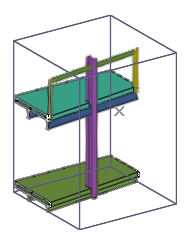
Create a clip box around a picked point
-
On the View tab, click .
-
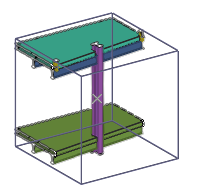
In the model, pick the center point for the clip box.
The clip box is created. The axis of the clip box follows the work plane.
-
To change the position of the clip box, pick a new center point for the clip box.
-
To finish creating a clip box, press Esc.
-
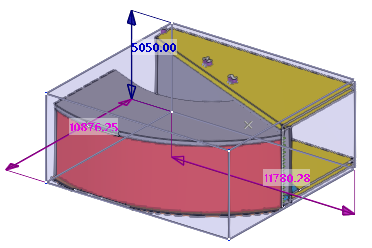
To adjust the clip box size, select the clip box.
The direct modification handles appear to the clip box.
-
Drag any of the handles, or modify the dimension values.
-
Delete the clip box when you do not need it anymore.
- To delete a clip box, select the clip box and press Delete.
- To delete all clip boxes in all open views, click .
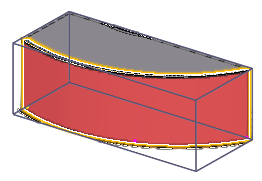
Create a clip box around a selected object
In addition to the default sized clip box, you can create a clip box around a selected part, assembly, bolt, reinforcement, reference model, reference object, or buildings or spaces in building hierarchy. The clip box then contains only the selected object.
-
In the model, select the object you want to create the clip box around.
-
Right-click and select Create clip box.
The clip box is created around the selected object, with its geometry defined by the object. The orientation of the clip box follows the coordinate system of the selected object.
-
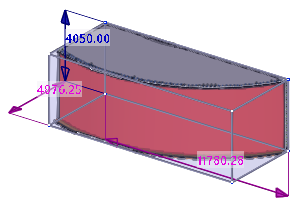
To adjust the clip box size, select the clip box.
The direct modification handles appear to the clip box.
-
Drag any of the handles, or modify the dimension values.

-
Delete the clip box when you do not need it anymore.
- To delete a clip box, select the clip box and press Delete.
- To delete all the clip boxes in all the open views, click .
Create a view depth clip plane
If the model objects do not fit to the work area view depths, you can create view depth clip planes on the contextual toolbar.
Based on the view depth, you can, for example, easily isolate an entire floor from a building. View depth clip planes can be created both in native Tekla Structures models as well as in reference models and overlay models.
-
On the contextual toolbar,
click Add or update view depth clip planes
 .
.
-
If you want to remove the
view depth clip planes, click Remove view depth clip planes
 on the
contextual toolbar, or click .
on the
contextual toolbar, or click .
Note that the work area box may have gaps to view depths, and when working with overlay models, you can clip models that are outside the work area.
Limitations:
-
You cannot move the view depth clip planes by dragging the clip plane to a new location. This is because the view depth clip planes are strictly connected to the view depth.
-
After you have adjusted the view depth, click the Add or update view depth clip planes button to manually update the view depth clip plane.