Create bolt holes
Tekla Structures uses the same command for creating bolts, studs and holes. Before creating holes, you need to change some of the properties in the Bolt properties. If you want to create only holes, do not use any bolt elements (such as bolts, washers, and nuts).
You can create the following types of holes:
-
Round
-
Oversized
-
Slotted
-
Tapped
When several parts are connected together with a bolt group or single bolt, you can create different holes in each of the parts, or you can use the same properties for the special holes in all the parts.
You can also select whether the holes you create are open throughout the parts, or partial-depth or blind holes that do not extend completely through the parts.
The hole properties are available in the Holes section in the Bolt properties.
Create round holes
You can create a group of round holes, or a single round hole. Tekla Structures calculates the diameter of a round hole as the sum of Size and Tolerance.
-
On the
Steel tab, hold down Shift and click
 Bolt to open the Bolt properties.
-
If you do
not want to create any bolts, clear all the Assembly checkboxes.
Create oversized holes
You can create a group of oversized holes.
-
On the Steel tab, hold down Shift and click Bolt to open the Bolt properties.
-
If you
do not want to create any bolts, clear all the Assembly checkboxes.
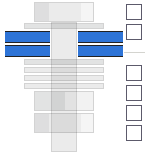
-
Next to
Parts with special holes, indicate which plies of the connection get oversized holes by selecting
the desired Special hole checkboxes.
For example:
Create slotted holes
You can create a group of slotted holes. You can also create slotted holes with offsets from the bolts.
-
On the Steel tab, hold down Shift and click Bolt to open the Bolt properties.
-
If you do
not want to create any bolts, clear all the Assembly checkboxes.
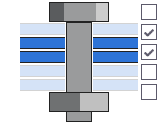
-
Next to
Parts with special holes, indicate which parts should be slotted by selecting the desired
Special hole checkboxes.
Tekla Structures counts the pieces of steel from the head of the bolt down. For example, if you select the second checkbox from the head of the bolt, Tekla Structures slots the second piece of steel from the head of the bolt.
-
Enter the
allowance for the slotted hole in the x and y directions of the hole group
using the Slotted hole X and Slotted hole Y boxes.
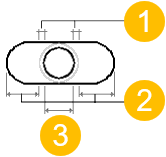
(1) Tolerance
(2) Slotted hole X or Y
(3) Bolt size
Create tapped holes
You can create tapped holes that have threads drilled in them.
-
On the Steel tab, hold down Shift and click Bolt to open the Bolt properties.
-
If you do not want to create
any bolts, clear all the Assembly checkboxes.
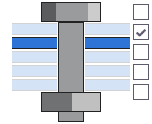
-
Next to Parts with special holes, indicate which plies of the connection get tapped holes by selecting the
desired Special hole checkboxes.
For example:
Create different holes with one bolt group
When several parts are connected together with a bolt group or single bolt, you can create different holes in each of the parts. For example, the holes in one part can be slotted, and the holes in the other parts can be either special holes or regular round holes.
Up to five parts can get special bolt holes with one bolt. The rest of the connected parts (the sixth and so on) will get regular round holes.
-
On the Steel tab, hold down Shift and click Bolt to open the Bolt properties.
-
Next to Parts with special holes, indicate which parts get special holes by selecting the desired
Special hole checkboxes.
For example: