Edit custom components
Use the custom component editor to fine-tune existing custom components, and to modify a simple custom component so that it adapts to changes in the model.
In the custom component editor you can build dependencies between component objects and model objects. For example, you can specify that the size of a stiffener depends on the size of the beam. If you change the size of the beam, the size of the stiffener also changes.
You can also add distance variables, for example, to specify the gap between a plate and a beam. You can modify only the component objects, not the main or secondary parts, in the custom component editor. When you have edited a custom component, Tekla Structures updates all instances of that component throughout the model with the changes you have made.
-
In the model, select the custom component by clicking the green component symbol
 .Note:
Custom parts do not have a component symbol in the model. To select custom parts, ensure that the Select components
 selection
switch is active.
selection
switch is active. -
Right-click and select Edit custom component.
Alternatively, click the Applications & components
 button in the side
pane to open the Applications & components catalog, and click the Access advanced features
button in the side
pane to open the Applications & components catalog, and click the Access advanced features  button and
select Edit custom component.
button and
select Edit custom component.The custom component editor opens. It shows the Custom component editor toolbar, the Custom component browser and four views of the custom component.
Custom component editor toolbar

Custom component browser
Four different views of the custom component

-
Modify the custom component in one of the four custom component views. Only component objects, not the main or secondary parts, can be modified in the custom component editor.
You can, for example:
-
Add or remove component objects.
For example, add extra bolts or stiffeners to the component.
-
Bind component objects to model objects so that component objects adjust for new beam size or profile.
-
Create fields for material grade, profile, bolt size, and other properties that will be visible in the custom component dialog box.
-
Create formulas to calculate values, for example, for calculating bolt edge distance using bolt size.
-
-
Save the custom component.
To
Do this
Save changes to all copies of the custom component
-
On the Custom component editor toolbar, click the Copy component to library
 button.
 -
In the Save confirmation dialog, click Yes.
Tekla Structures saves the changes and applies them to all copies of the custom component in the model.
Save the component with a new name
-
On the Custom component editor toolbar, click the Copy component to library with new name
 button.
 -
Enter a new name for the component.
Save and close the component
-
On the Custom component editor toolbar, click the Close
 button.
 -
In the Close custom component editor message, click Yes.
If you click No, the custom component editor closes without saving the changes.
-
Custom component editor toolbar
Use the tools on the Custom component editor toolbar, for example, to create distances, select planes, and to save the component.
| Icon | Description |
|---|---|
|
Create distance
|
Create a distance. Select the plane first and then the handle or chamfer where to bind. |
|
Create reference distance
|
Create a reference distance. |
|
Automatically create distances for picked components' handle points
|
Create distances automatically. Tekla Structures binds the selected part to their handles’ contact planes. Tekla Structures selects planes in the following order:
|
|
Create construction plane
|
Create a construction plane. |
|
Add construction line
|
Add a construction line. |
|
Plane types |
Show the plane types you can use when defining distance variables. |
|
Custom component settings
|
Edit the type or the position of a custom component, or add notes after you have created the component. |
|
Display variables
|
Show all created variables. |
|
Display custom component browser
|
Open the Custom component browser. |
|
Copy component to library with new name
|
Save the custom component with another name. Enter a new name for the component. |
|
Copy component to library
|
Save changes to all copies of the custom component. In the Save confirmation dialog, click Yes. Tekla Structures saves the changes and applies them to all copies of the custom component in the model. |
|
Close editor
|
Save and close the editor. In the Close custom component editor message, click Yes. If you click No, the custom component editor closes without saving the changes. |


Tekla Structures saves the custom components in the current model folder, in the xslib.db1 file, which contains custom components and sketched profiles.
The custom component dialogs are saved separately in the CustomComponentDialogFiles folder in the current model folder.
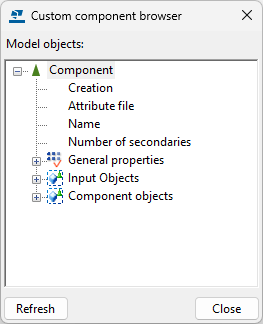
Custom component browser
Custom component browser shows the contents of a custom component in a hierarchical, tree-like structure.
The Custom component browser works with the custom component editor views. When you select an object in the Custom component browser, Tekla Structures highlights the object in the views, and vice versa.
The Custom component browser
- lists the model objects, to which the custom component is attached
- lists the objects the custom component creates
- enables creating links between custom component variables and component object properties.
By selecting a property in the Custom component browser and right-clicking the property you can copy names, values, and references from the main and secondary parts in the component, and then use them in the Variables dialog to define the properties of custom components.
Protect a custom component with a password
You can protect a custom component with a password to prevent unauthorized modifications. Password-protected custom components can still be added to models as usual.
- Select the custom component in the model, right-click and select Edit custom component.
- On the Custom component editor toolbar, click the Display variables
 button.
 The Variables dialog opens.
- To create a new parametric variable, click Add.
- Modify the parametric variable as follows:
-
In the Name box, enter Password.
- In the Formula box, enter the desired password.
-
- Save the custom component.
The next time someone attempts to edit this custom component, they will be prompted for the password.
 Note:
Note:If you have a password-protected custom component and you explode it in the Custom component editor, you have two options:
- Use the Explode component command to explode the custom component without creating component parameters and mappings.
- Use the Explode component with parameters command, which prompts you for the password. The component will only be exploded, and its parameters and mappings created, after you enter the correct password.