Prepare and create Excel (XLSX) reports
You can create Excel (.xlsx) reports in Tekla Structures. The content and formatting of these reports is defined using an .xlsx.rpt template created with Template Editor and an .xltx template created with Microsoft Excel.
Compared to the older HTML-based templates or Organizer, the Excel (.xlsx) reporting method:
- Eliminates VBA macros: You no longer need to create and maintain complex, brittle VBA macros, which are difficult to edit and are increasingly restricted by corporate IT security policies.
- Provides full formatting control: Unlike the limited HTML-based report (.xls.rpt), this method allows for fully pre-configured Excel templates (.xltx). You can define company logos, headers/footers, print settings, cell formats, and advanced table styles. The final report is a native, ready-to-use Excel file.
- Improves security and compatibility: The resulting modern
.xlsxformat is the industry standard and avoids security filters that often block or quarantine older macro-enabled.xlsfiles. - Streamlines workflow: The process is more direct and intuitive, reducing the steps to get a polished, finalized report from Tekla Structures.
Notes and limitations
- For complex formatting, like using Excel built-in table styles for alternating row colors, we highly recommend you to define it within the
.xltxExcel template, rather than relying on the basic formatting options in the.rptfile. - Report logic, such as
ifstatements, is handled within the Template Editor value field formulas, not within the export process itself. - To use
{}as literal characters in the Excel template, avoid using them for non-attribute text. The curly brackets{}are reserved for Tekla Structures attributes, but a cell can contain multiple attributes and other text (for example, "Part: {PART_POS}, Weight: {WEIGHT}").
Steps to produce an XLSX report
-
In Microsoft Excel, prepare the Excel template (.xltx).
- In Template Editor, prepare the textual template (.xlsx.rpt).
- In Tekla Structures, export the Excel report (.xlsx).
For details, see the instructions below.
Prepare Excel template (.xltx)
Prepare textual template (.xlsx.rpt)
Export Excel report
- In the Report dialog, select a report template with the
.xlsxsuffix.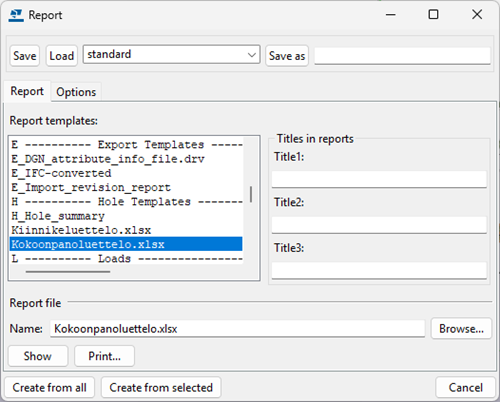
- In the displayed Export data to Excel dialog, select the Excel template (
.xltx) to use and define the export settings.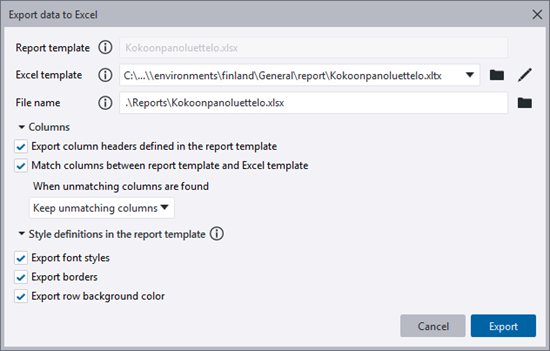
The available options:
- Excel template: Select the target
.xltxtemplate from the dropdown list. The list shows Export to an empty sheet, up to 10 recently used templates, and all available templates from the standard folders. - Configure the export using the checkboxes. These settings are preserved for the current Tekla Structures session.
- Export column headers defined in the report template: Exports the column headers from the
.xlsx.rptfile as the first row of the data block. - Match columns between report template and Excel template: Maps the columns from the
.rptfile to the columns in the.xltxfile by matching the header names. If this is not selected, columns are inserted in the order they appear in the .rpt file. - When unmatching columns are found: Select one of the following options which are available only if Match columns between report template and Excel template is selected:
Discard unmatching columns: Columns from the
.rptfile that do not have a matching header in the.xltxtemplate will not be included in the export.Keep unmatching columns: The unmatching columns will be exported and placed to the right of the columns defined in the
.xltxtemplate. - Export font styles: Exports the bold and italic styles set in the
.rptfile. - Export borders: Exports the border settings defined for rows in the
.rptfile. Borders can also be defined for individual text objects and value fields in the row component, which apply to single cells. Row border settings apply to the entire exported row, not just cell-to-cell borders. - Export row background colors: Exports the background colors defined for rows in the
.rptfile.
- Export column headers defined in the report template: Exports the column headers from the
- Excel template: Select the target
Examples
Excel template example
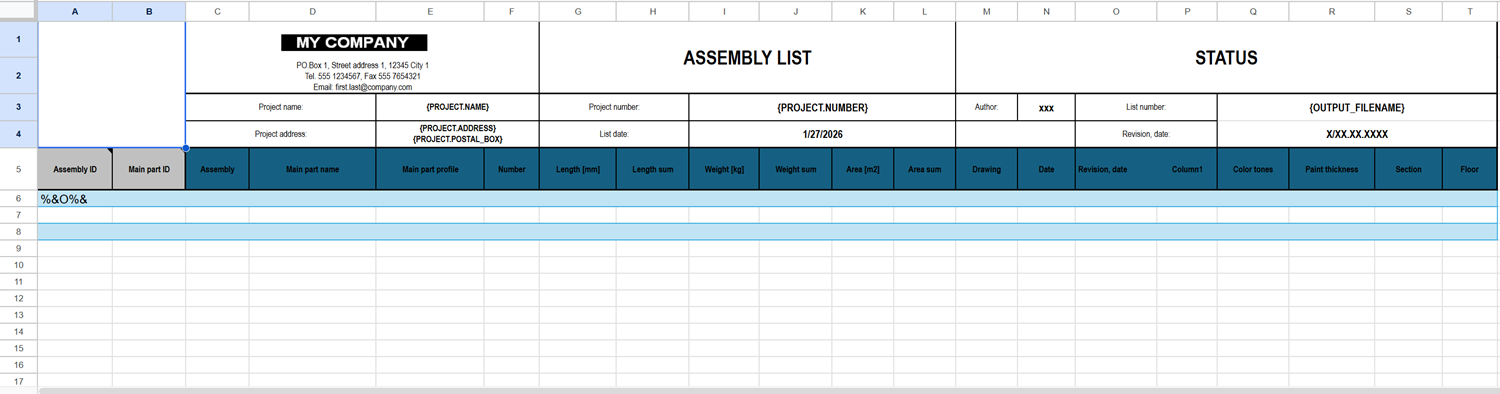
In the following .xltx template example, the %&O%& string has been placed in a cell to mark where the main data rows from the .xlsx.rpt file will be inserted.
To see the example template in a larger size, right-click the image and select the option to open the image in another browser tab or window.
XLSX.RPT example
Below is an example with a part of the Template Editor xlsx.rpt template containing column headers for the data rows and the needed value fields.
To see the example template in a larger size, right-click the image and select the option to open the image in another browser tab or window.

XLSX example
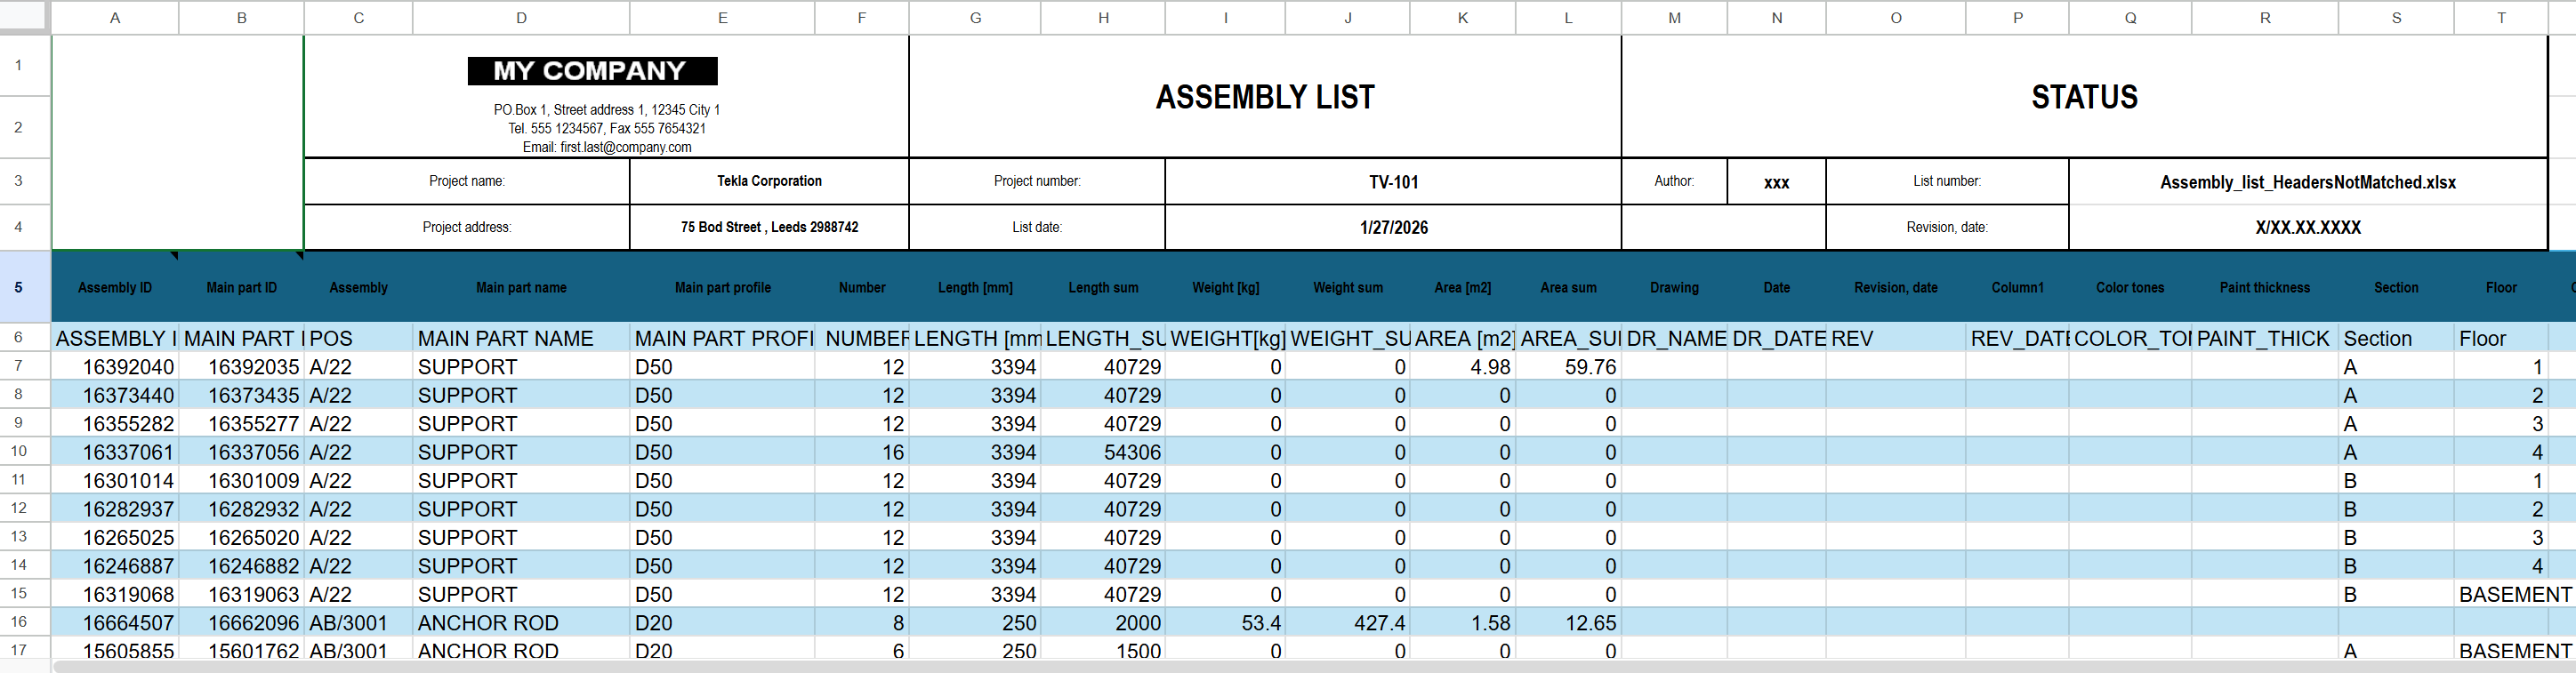
Below is an example of the final report where data from the model has been retrieved.
To see the example report in a larger size, right-click the image and select the option to open the image in another browser tab or window.