New Freeze rebar sets command and other updates in reinforcement features
Tekla Structures 2026 introduces new commands and settings that you can use to prevent automatic adjustments and unwanted changes in rebar sets that have already been detailed or fabricated. Now you can also split rebar sets the same way as rebar groups. Bar layer offsets of rebar sets and labels for rebar objects can be shown in model views.
Freeze and unfreeze rebar sets
You can now freeze rebar sets so that they do not change when the surrounding model is modified. This is useful, for example, when the bars have already been fabricated.
The new Freeze rebar sets and Unfreeze rebar sets commands are available on the Rebar ribbon tab, under More:
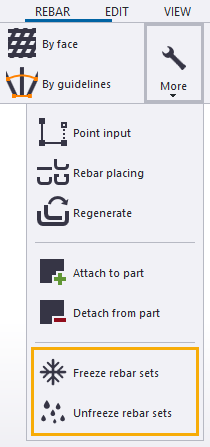
Alternatively, when you select rebar sets in the model, and right-click, you can use the Freeze/Unfreeze command from the context menu, and then select Freeze or Unfreeze.
In model views, frozen rebar sets, leg faces, and leg surfaces are indicated with a snowflake symbol  next to the bar layer number when you select rebar sets and when the leg faces are visible.
When frozen rebar sets are selected, the number of frozen rebar sets is shown in the property pane header. For example: Rebar set (3 selected, 1 locked, 1 frozen)
You can also use the IS_FROZEN template attribute in reports to check if a rebar set is frozen or not, or to filter frozen rebar sets, for example. The attribute shows 0 if the rebar set is not frozen, 1 if the rebar set is frozen, and 2 if the rebar set is partially frozen, meaning that some of its leg faces are frozen and some are not.
TTSD-70398, TTSD-73525, TTSD-71662, TTSD-73534, TTSD-70352
New bar placement and layering settings for rebar sets
There is a new Bar placement section in the rebar set property pane with the following settings:
-
Automatic layering
This setting is also available in the Bar leg placement section in the leg face and leg surface properties.
When a rebar set, leg face, or leg surface is frozen, Automatic layering is off.
-
Layer number has been moved from the Special section to this new section.
When a rebar set, leg face, or leg surface is frozen, Layer number is not available, but may change unless you lock the rebar set.
-
Offsets
When a rebar set is frozen, the At depth, Start, and End offsets are available.
-
Adaptivity
When you freeze a rebar set, Adaptivity is set to Off, but you can manually select another option.
TTSD-71781, TTSD-71895
New offset types for leg faces and leg surfaces
In addition to the layering settings Automatic layering and Layer number, the section renamed from Attributes to Bar leg placement in the leg face and leg surface properties now contains new offset types. The new Offset settings replace the previous Additional offset property. The offset types are:
-
From concrete cover
This option works the same way as the previous Additional offset property and is only available when Automatic layering is on.
-
From previous layer
This option is only available when Automatic layering is on.
-
From leg face to bar edge
When freezing a rebar set that uses the concrete cover value of the parent concrete part, the Offset setting is changed to this option. The leg face or leg surface is located on the face of the part.
-
From leg face to bar center
When freezing a rebar set that does not use the concrete cover value of the parent concrete part, the Offset setting is changed to this option. The leg face is not on the face of the part, but is either entirely inside or outside the part.
Using the Inquire rebar set layers command now also reports the new offset types.
TTSD-71780, TTSD-71895, TTSD-73535
Offset values of rebar sets in model views
The overall offset value can now be displayed on each rebar set leg face and leg surface in model views, next to the layer number. The offset is comprised of the concrete cover, the bar layering offset, and any additional offset defined. This offset is shown when the Rebar dimensions and Leg faces checkboxes are selected under Visibility on the Rebar ribbon tab.
TTSD-73112
Split rebar sets
You can now use the Split command to split rebar sets. Previously, you could split parts, single reinforcing bars, and normal and tapered reinforcing bar groups.
You may need to split a rebar set, for example, when you want to add only a portion of it into a rebar assembly.
To split a rebar set, go to the Edit tab on the ribbon and click Split. Select the rebar set, and pick two points for the splitting line.
Rebar sets with leg faces can be split in any direction.
Limitations:
-
Splitting only works with rebar sets that have one or two straight guidelines. If you try to split a rebar set that has more than two guidelines or a curved guideline, Tekla Structures shows a message saying "The object cannot be split in this position".
-
Rebar set leg surfaces cannot be cut. If a rebar set has leg surfaces, splitting only works perpendicular to the guideline (=parallel to the bars).
TTSD-69992
Labels for reinforcement objects in model views
Similarly to part labels, you can now show labels for reinforcement objects in model views. There is a new section, Rebar label, on the Advanced tab in the Display dialog. There you can define the contents of the rebar labels, and whether they are shown for all or the selected reinforcement objects:
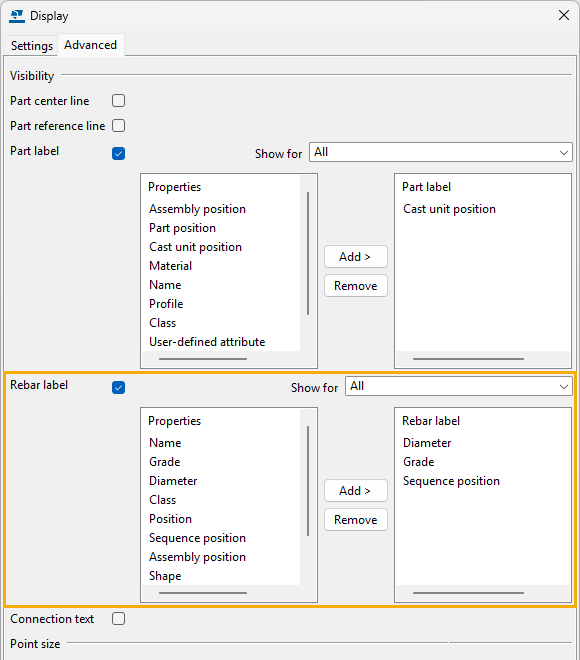
For more information, see Show part and reinforcement information by using part and rebar labels.
TTSD-69110
Other reinforcement changes
-
In the Auto splitter component, a new splicing symmetry option
 is now available that allows splitting reinforcing bars so that all resulting bars have equal length. This length is as close to the maximum allowed length as possible.
TSAC-8871
-
The following template attributes are now available for reinforcement objects with the
REBARandSINGLE_REBARcontent types and in rebar marks:TOP_LEVEL,TOP_LEVEL_GLOBAL,TOP_LEVEL_BASEPOINT,TOP_LEVEL_PROJECT,BOTTOM_LEVEL,BOTTOM_LEVEL_GLOBAL,BOTTOM_LEVEL_BASEPOINT,BOTTOM_LEVEL_PROJECTTTSD-69106
-
The following advanced options have been hidden from the Tekla Structures user interface:
-
XS_REBARSET_SHOW_LEGFACES -
XS_REBARSET_SHOW_GUIDELINES -
XS_REBARSET_SHOW_PROPERTY_MODIFIERS -
XS_REBARSET_SHOW_SPLITTERS -
XS_REBARSET_SHOW_END_DETAIL_MODIFIERS -
XS_DISPLAY_DIMENSIONS_WHEN_SELECTING_REBARS -
XS_REBARSET_COLOR_BARGROUPS
Instead of these advanced options, you can use the commands on the ribbon, or the keyboard shortcuts Alt+1...7.
TTSD-74620
-
-
The Rebar sequence numbering macro that was available in the Applications & components catalog has been removed. Since Tekla Structures 2025, you have been able to assign reinforcement sequence numbers using the regular numbering commands on the ribbon.
TTSD-72545
If you are a Tekla Structures administrator
If you manage Tekla Structures settings for other users, update customized settings for users.
Update the ribbon for Freeze rebar sets and Unfreeze rebar sets
If you have customized the ribbon, update your customized ribbon to add buttons for the new Freeze rebar sets and Unfreeze rebar sets commands.
-
On the Rebar ribbon tab under More, add new Freeze rebar sets and Unfreeze rebar sets buttons.
-
Add ribbon item: Simple button
-
Command: Reinforcement.Freeze and Reinforcement.Unfreeze
-
Appearance: Command: Scalable icon
-
Text: Command: Full text
-
-
Save the changes.
The new ribbon configuration file is saved to C:\Users\<username>\AppData\Local\Trimble\Tekla Structures\2026.0\UI\Ribbons.
-
Move the file to the Ribbons sub-folder in a folder that is in the XS_SYSTEM path.
Update the property pane for automatic layering setting for rebar sets
If you have customized the property pane, update your customized property pane to update the properties pane for Rebar set leg face and Rebar set leg surface.
Make these updates in the PropertyTemplates.xml file in the PropertyTemplate Type="RebarSet.LegFace" and PropertyTemplate Type="RebarLegSurfaceObject" property templates:
- Replace the previous Attributes property group with the new Bar leg placement property group.
Before:
<PropertyGroup Name="Attributes" Label="translation:albl_Attributes" Tooltip="translation:albl_Attributes">After:
<PropertyGroup Name="BarLegPlacement" Label="translation:albl_Bar_leg_placement" Tooltip="translation:albl_Bar_leg_placement"> - Add a new property for Automatic layering as the first item under the new Bar leg placement property group:
-
<Property Name="Property.LegFace.AutomaticLayering" />