Import shapes into Tekla Structures
You can import the following types of shape files:
- dgn
- dwg
- dxf
- ifc
- ifcXML
- ifcZIP
- iges
- igs
- shapecatalog
- skp
- step
- stp
- tsc
When you import a shape into the shape catalog, Tekla Structures creates two files: one .xml file for shape attributes, such as the name and GUID, and one .tez file for geometric properties, such as coordinates. The files are saved in the current model folder under the \Shapes and \ShapeGeometries sub-folders.
The shape name that is shown in the shape catalog is determined as follows:
-
If you import a .tsc or .shapecatalog file, the shape name is read from the imported file.
-
If you import other file types, the shape name is the name of the imported file.
Tip:
You can also download shapes from Tekla Warehouse, or create shapes using existing geometry in Tekla Structures models.
Import shapes
When you use other modeling software to model shapes that you want to import into Tekla Structures, we recommend that you center parts around the origin and direct the parts along the x axis.
From Tekla Structures models you can also import shape catalog groups either with the shapes as .shapecatalog files or without the shapes as .ShapeCatalog.Groups.xml files.
-
Click
 Import.
-
Click OK
to complete the import.
The groups that contain new or modified shapes are marked with
 on the left side of the
Shape catalog dialog. The new or modified shape rows are highlighted in yellow in
the list of shapes.
on the left side of the
Shape catalog dialog. The new or modified shape rows are highlighted in yellow in
the list of shapes. -
Click
 Save to save changes to the shape catalog.
Shape import has three possible results:
-
Tekla Structures imports the shape as a watertight solid shape. All solid operations are available.
-
Tekla Structures imports the shape as a non-solid shape. A non-solid shape means that the object might not be watertight. For example, it has holes, or is missing a face or an edge.
-
Import fails. The import can fail for several reasons, such as if the shape is very complex or has no volume. There might also be a tolerance difference between Tekla Structures and the original software that was used to create the shape. To find out why the import failed, check the session history log by going to .
The Solidity column in the shape catalog shows whether a shape is solid or non-solid.
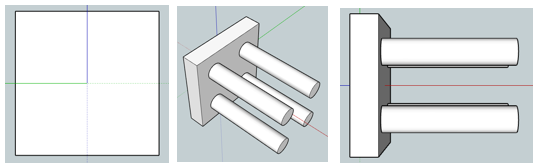
Example: Import a shape from SketchUp Pro
This example shows how to import a solid 3D shape from Trimble SketchUp Pro to a Tekla Structures model.
-
Place the solid in SketchUp so that it lies along the positive x axis (red), and halfway on both y (green) and z axes (blue). In
Tekla Structures, the yellow and magenta part handles will align with the x axis used in SketchUp.
The location and rotation of the solid in SketchUp are important, since they determine how an item is inserted and positioned in Tekla Structures. Different positioning in SketchUp causes an offset in Tekla Structures.
-
In your Tekla Structures model, open the Shape catalog dialog and click Import.
Tekla Structures imports the shape to the shape catalog and you can use it to define the shape of an item or a concrete item.