
Work with BCF Topics in Tekla Structures
BCF topics are notes that are added to a linked Trimble Connect project. BCF stands for BIM Collaboration Format and it is an open industry standard from buildingSMART International. Using the BIM Collaboration Format (BCF), you can communicate project-based issues between different BIM applications, such as Tekla Structures, Tekla PowerFab and Trimble Connect, as well as other third-party applications. BCF topics are stored and managed in a Trimble Connect project.
Before you can start adding BCF topics in Tekla Structures, your model needs to be linked to a Trimble Connect project. See instructions here: Link a Tekla Structures model to a Trimble Connect project.
BCF topics can be used with .tekla, .ifc, and .trb files that are created from a Tekla Structures model and uploaded to Trimble Connect.
-
A .tekla file that is created when you upload the current Tekla Structures model to a Trimble Connect project. Using a .tekla file is the preferred way of working.
If you are using Tekla Model Sharing with a Trimble Connect project, the model is automatically uploaded when you write out or create a new baseline. Note that if the .tekla file is uploaded to a Trimble Connect project for the first time after using the Write out or Create baseline commands, you need to write out the changes again. This is needed because after a .tekla file is uploaded, an .xml file with a model ID is created in the model folder.
-
An .ifc file that is created from a Tekla Structures model and uploaded to a Trimble Connect project.
-
A .trb file that is created from a Tekla Structures model when exporting to Tekla PowerFab and uploaded to a Trimble Connect project.
Create and modify BCF topics
Before you begin adding BCF topics in Tekla Structures, ensure that your model is linked to a Trimble Connect project.
Use topics to communicate, assign, track, and resolve issues within a project. You can view all the topics that you have created or that have been assigned to you in the Tekla Structures BCF Topics side pane.
-
On the Trimble Connect ribbon tab, click
 BCF Topics.
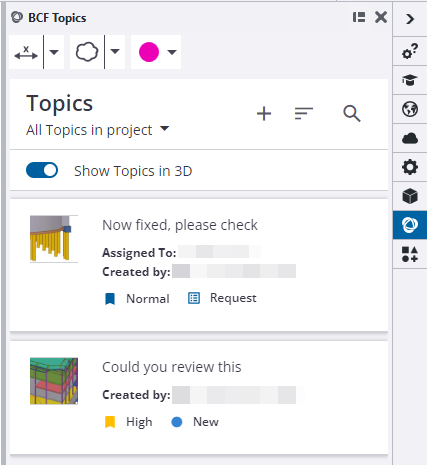
The BCF Topics side pane opens and displays the BCF topics added to the Trimble Connect project.
-
To create a new BCF topic,
click the plus
 button.
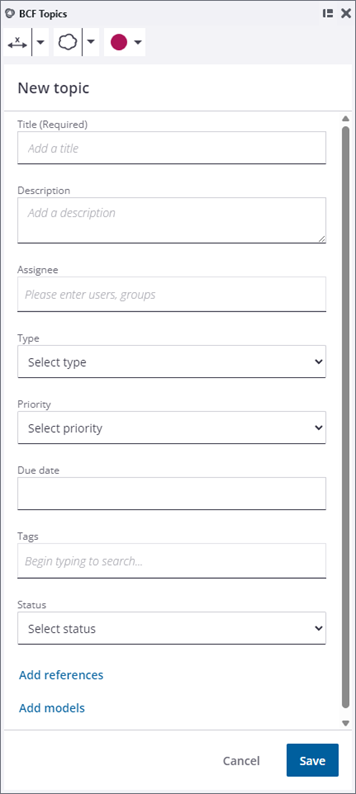
The New topic page opens.
-
Use Add
references to add references to documents or links.
A topic can reference multiple documents or links. You can add, for example, a PDF file as a reference.
-
On the
Add references page, select the type of
reference that you want to add:
- Under
 , select the desired reference file from the list of project files.
 Attached project files always point to the latest version of the file stored in the Trimble Connect project.
- Under
 , browse for a desired reference file to add a new file.
 - Under
 , enter the display text for the desired link and the URL.
- Under
-
To add or remove
reference files:
- To add more reference files, click to open the Add references page.
- To remove a reference file, click
 next to the file.
You can also work with the references on the
 References page after the BCF topic has been created.
 - To add more reference files, click
-
On the
Add references page, select the type of
reference that you want to add:
-
Use Add
models to add model files, if needed.
To enable the collaboration workflow using BCF topics, you need to have a model uploaded to a Trimble Connect project. The preferred way of working is to upload your model as a .tekla file. If you have already uploaded a .tekla file to the linked Trimble Connect project, you do not need to use the Add models option.
If you are using an .ifc or a .trb file instead of a .tekla file, use the Add models option to select the file that contains the objects associated with the BCF topic that you are creating in Tekla Structures.
Note that if you are using .ifc or .trb files, you need to manually associate each BCF topic with an .ifc or a .trb file when you create BCF topics in Tekla Structures. You can associate your BCF topics with multiple .ifc or .trb files at once.
In Trimble Connect, the association happens automatically, and therefore the Add models command is not available in Trimble Connect. When BCF topics are created in Trimble Connect, Trimble Connect knows which models are visible in the view and stores this information with the BCF topics. These BCF topics will work correctly in Tekla Structures.
-
On the
Add models page, select the type of model
file that you want to add:
- Under , select the desired model file from the list of project files.
- Under , browse for a desired model file to add a new file.
- Under
-
To add or remove
model files:
- To add more model files, click to open the Add models page.
- To remove a model file, click next to the file.
You can also work with the models on the
 Models page after the BCF topic is created.
 - To add more model files, click
-
On the
Add models page, select the type of model
file that you want to add:
-
Click Save.
A view is always automatically added to each new topic.
The saved BCF topic is immediately synchronized to Trimble Connect.
You can then continue by adding, for example, comments and views with graphical markups and measurements.
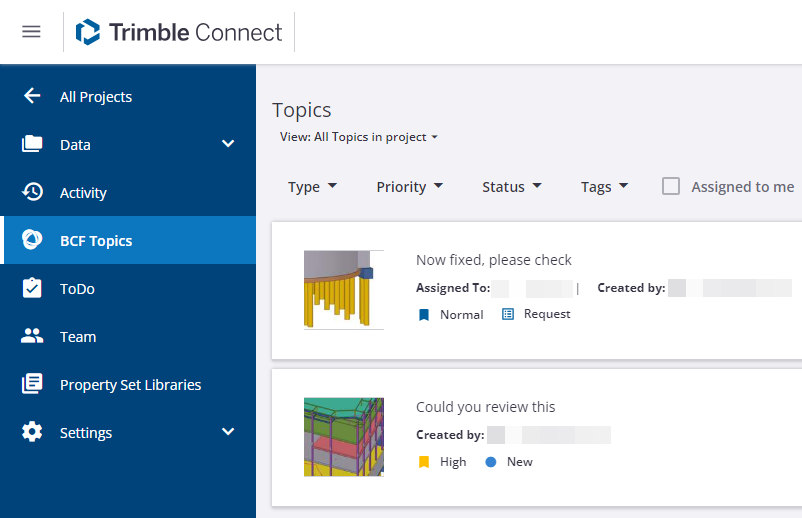
In Trimble Connect, you can see the BCF topics on the BCF Topics page of the linked project.
-
If you want to further edit
a BCF topic in Tekla Structures:
To Do this Define which topics are shown on the Topics page in BCF Topics side pane
In the BCF Topics side pane, click the arrow under Topics and select the option.
By default, the Active topics are shown.
Sort the topics
In the BCF Topics side pane, click
 at the top of the side pane and select the sorting option.
 The default sorting order is by Creation date.
Edit a topic
You can edit topics that you have created or that have been assigned to you.
-
In the BCF Topics side pane, select the BCF topic that you want to edit.
The topic opens on its own page.
- Click
 Edit.
Edit. - Adjust the BCF topic information according to your needs.
- To save the changes, click Save.
Assign a topic
You can assign topics that you have created or that have been assigned to you.
-
In the BCF Topics side pane, select the BCF topic that you want to assign to someone.
The topic opens on its own page.
- Click
Edit.
- In the Assignee field, enter the names of the users or the user groups. Multiple users or user groups can be listed in the Assignee field.
- To save the changes, click Save.
Remove a topic
You can only delete the topics that you have created. Deleting topics from the project cannot be undone. If you delete a topic, the topic will be deleted for everyone to whom it has been assigned. All the data is also deleted.
-
In the BCF Topics side pane, select the BCF topic that you want to remove.
- Click
 Remove.
 - Click Delete.
-
Create measurements and markups
You can create measurements and markups in BCF topics and display the measurements and markups both in Tekla Structures and in Trimble Connect. To add measurements and markups in the current model, use the measurement and markup tools in the BCF Topics side pane.
Markups and measurements are saved in a view. You cannot add them separately in an already existing view.
You cannot edit the inserted measurements or markups in Tekla Structures. You can edit them in Trimble Connect and transfer them to Tekla Structures by creating a new view.
| Option | How to use |
|---|---|
|
Select the type of the measurement that you want to create. |
Displays the distance between two points.
|
|
Show the coordinates of a single point.
|
|
|
Show the angle measurement between two points.
|
|
|
Select the type of the markup that you want to create. |
Add a cloud markup.
|
|
Add an arrow markup.
|
|
|
Add a line markup.
|
|
|
Add a text markup. Text markup consists of text and a leader line. You cannot edit text after it has been inserted in the model.
|
|
|
Draw a freehand markup.
|
|
|
|
Select the color for the measurements and markups. In addition to the predefined set of colors, you can use your own custom colors:
|
|
Remove all markups from the model. |
Click the delete button at the bottom of the measurement tool list or the markup tool list to remove all measurements or markups from the model. You cannot delete single measurements or markups. |


 button to
open the color picker.
button to
open the color picker. 
Add views
-
Click
 Views to open the views page.
You can see the views that have been added to the topic. A topic can contain multiple views.
-
To add a new view, click
 .
.
A new view is added to the topic. The view is taken from the visible model view.
-
To delete a view, click
 at the bottom
corner of the selected view. Click
.
at the bottom
corner of the selected view. Click
.
Deleting views cannot be undone.
Note the following:
- When working with models uploaded from Tekla Structures as .tekla files, loading and saving topic views in Tekla Structures includes information about the selected and hidden objects.
- When working with IFC reference models in Tekla Structures, loading topic views that have been created in Trimble Connect includes information about the selected and hidden objects.
- When working with IFC files that have been inserted as overlay models in Tekla Structures, loading topic views that have been created in Trimble Connect includes information about the selected and hidden objects.
- For BCF topics that have been created in third-party applications, loading topic views in Tekla Structures displays the selected and hidden objects in the model view.
Add comments
-
Click
 Comments to open the comments page.
Comments from project members are listed as a comment thread showing who made the comment and when.
-
To add a new comment, click
 Add
comment.
Add
comment.
-
Type any comments. You can
also add attachments or an image.
- Click
 to
add attachments. Attachments can be project files or local files.
to
add attachments. Attachments can be project files or local files. - Click
 to
add an image of the current model view.
to
add an image of the current model view.
- Click
Add markers
A marker can be used to specify the exact location of the topic in the model view by using x, y, and z coordinates.
You can add only one marker to each topic, but all model markers are displayed in the model.
-
Click
Models to open the models page.
-
To delete a marker, click
next to the marker
coordinates and select Remove.
Link model objects
If a topic is relevant to specific model objects, you can link the model objects to topics. The model object identifiers are saved to the topic data as references.
You can view the linked objects in both Trimble Connect and Tekla Structures with .tekla and .ifc files and overlay models.
Note that BCF topics are not yet supported in the Trimble Connect 2D viewer.
-
Click
Models to open the models page.
-
To remove all linked model
objects from a topic, click and select
Unlink all.
Note the following:
- When working with IFC reference models in Tekla Structures, objects linked to the BCF topics that have been created in Trimble Connect are highlighted.
- When working with IFC files that have been inserted as overlay models in Tekla Structures, objects linked to the BCF topics that have been created in Trimble Connect are highlighted.
Use base points with BCF topics
BCF topic views in Tekla Structures are saved relative to the project base point. If no project base point is set, the global origin (0, 0, 0) is used as the reference.
To ensure BCF topics are displayed correctly when they are opened in Trimble Connect:
- Set the project base point before uploading the model to Trimble Connect and before creating any BCF topics.
- Keep the project base point unchanged throughout the collaboration. Changing it after models have been uploaded or BCF topics have been created can cause views to appear misaligned.
- Use the same coordinate context when creating a BCF topic as was used for the attached model. If the model was exported with a specific base point, that base point should be the active project base point when creating the BCF topic.
Additional base points can still be used for IFC import and export. Switching between base points in the model does not affect existing BCF topics, as long as the project base point remains the same. If the project base point needs to be changed, the model must be re-uploaded to Trimble Connect, and all existing BCF topic screenshots and views must be recreated using the new base point. Previously created BCF topics will not update automatically and will no longer align with the model.
Note:
If a topic view appears out of place or the model is not visible when opening a BCF topic in Trimble Connect, it is likely caused by a mismatch between the project base point used when creating the BCF topic and the base point used for the attached model.
Export BCF topics
You can export BCF topics as .bcf files or in .pdf format.
Note that BCF files contain only the topic data. Topics often refer to models via 3D views. Therefore, models need to be exported separately, as the model files are not included in the BCF files.
-
Click at the top row of the
topic and select Export.
The Export BCF Topics page opens.
Change the language of the BCF Topics side pane
You can change the language of the BCF Topics side pane if needed. Note that changing the language in Tekla Structures does not affect the language of the BCF Topics side pane.