Create an estimating job

Tekla PowerFab
2023
Tekla PowerFab Tekla PowerFab GO

Create an estimating job

To create a new job, you need to define a few properties.

  1. Open the module.

    The Select <Module> Job dialog box opens.

  2. Click Add

    The <Module> Job Edit dialog box opens.

Continue to defining the properties on the tabs.

By clicking the buttons, you can find more settings.

Note: Defining job-specific properties is optional. If you do not define job-specific properties, Tekla PowerFab uses the default properties defined in Maintenance > Company Standards.

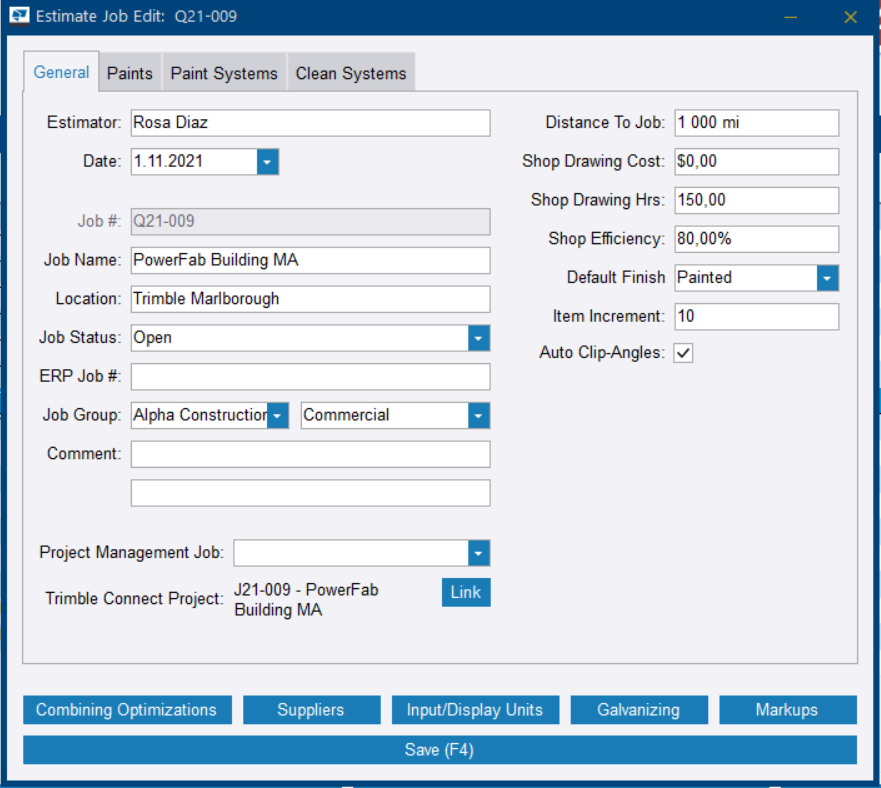
Define general settings

  1. In the <Module> Job Edit dialog box, select the General tab.
  2. Add or modify the properties as needed.
    Option Description
    Estimator

    The name of the estimator.

    You can sort estimating jobs based on the estimator.

    Date

    The date on which the bid is due.

    Tekla PowerFab automatically uses the date when you create the job, but you can select a different date in the associated calendar.

    Job Name The description of the job.
    Location The town or city where the job takes place.
    Job Status The job is either still in progress (Open) or it has been finished (Closed).

    You can filter the Select <Module> Job dialog box by Job Status, so that only open jobs are shown.

    ERP Job #

    The accounting system job number.

    Typing the accounting system job number in the ERP Job # field allows you to link material items properly when you export information to an accounting system, such as Trimble Viewpoint.

    Job Group Job groups allow you to identify and classify jobs that are similar. This makes filtering and reporting easier when you have a long list of jobs.

    Either type a job group directly in the blank field, or click the arrow on the right side of the field to select an existing job group.

    Comment Any additional comments on the job.
    Distance To Job

    The distance to the job site.

    Tekla PowerFab uses the distance to calculate freight costs if you have selected the Freight Per Mile option in Freight Maintenance. For more information, see Modify freight pricing.

    Shop Drawing Cost

    The total cost of the shop drawings.

    The value is used in the fabrication summary report.

    Shop Drawing Hrs

    The total labor hours used in shop detail drawings.

    The value is used in the fabrication summary. Costs automatically include the Detailing labor rate set in Labor Rates.

    Shop Efficiency

    The efficiency percentage of the shop, used for calculating labor times. Shop efficiency is calculated by dividing the labor times accordingly.

    For example, typing 75% would increase overall labor times by 33.3%, whereas entering 125% would reduce the labor times by 20%.

    Note that shop efficiency cannot be set to 0.

    Default Finish

    The default finish used for new items in the estimating job.

    You can change the finish item by item.

    Item Increment

    Sets the autoincrement for item numbers.

    The default autoincrement of 10 allows items to be added in the list as needed, without having to renumber the other items in the job.

    For example, if items should be numbered as 10, 20, 30, ..., set the input increment to 10. If the autoincrement of item numbers is not necessary, type 1.

    Auto Clip-Angles

    When selected, Tekla PowerFab adds standard clips in the estimating items according to their labor codes.

    When cleared, standard clips are not used.

    Project Management Job

    The project management job that is linked to the job.

    By linking the job in this module and project management jobs to each other, you can share nesting results with the Project Management module. This way, you can save data transfer time.

    Edit: Trimble Connect Project

    The Trimble Connect project that is linked to the current estimating job.

    To link the estimating job to a Trimble Connect project, click Link, select a project in the Link Project to Trimble Connect dialog box, and click Link Project. For more information, see Use Trimble Connect with an estimating job.

  3. Do either of the following:
    • Click Save.

      The <Module> Job Edit dialog box closes.

    • Continue to add or modify properties.

Define paint settings

On the Paints tab, you can create and edit the paints used for an estimating job.

For information on creating default paint settings, see Manage default paint types and paint systems.
  1. In the Estimate Job Edit dialog box, select the Paints tab.

  2. Add or modify the properties as needed.
    To Do this
    Add a new paint type
    1. Click New Paint
    2. Define the paint properties.
    3. Click Add Paint.

    The new paint type is added.

    Modify a paint type
    1. Select the paint type.
    2. Modify the properties.
    3. Click Save Paint.

    Your changes are saved.

    Delete a paint type
    1. Select the paint type.
    2. Click Delete Paint
    3. To permanently delete the selected paint type, click Yes.

    The paint type is permanently deleted.

  3. Do either of the following:
    • Click Save.

      The <Module> Job Edit dialog box closes.

    • Continue to add or modify properties.

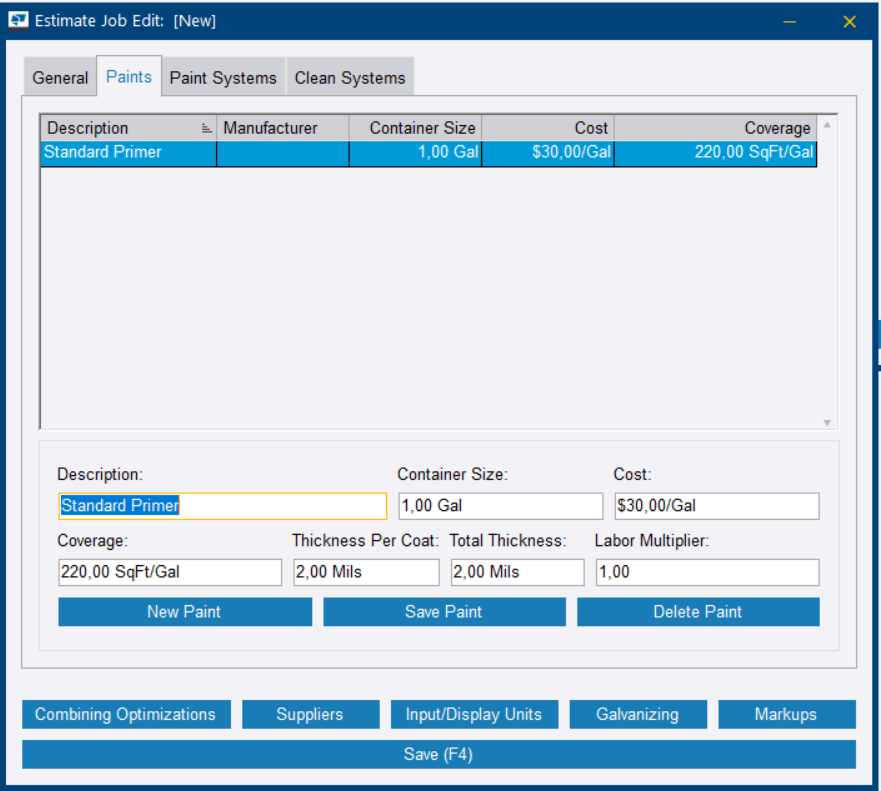
The paints listed on the Paints tab are applied to all painted items by default unless you assign a paint system to them.

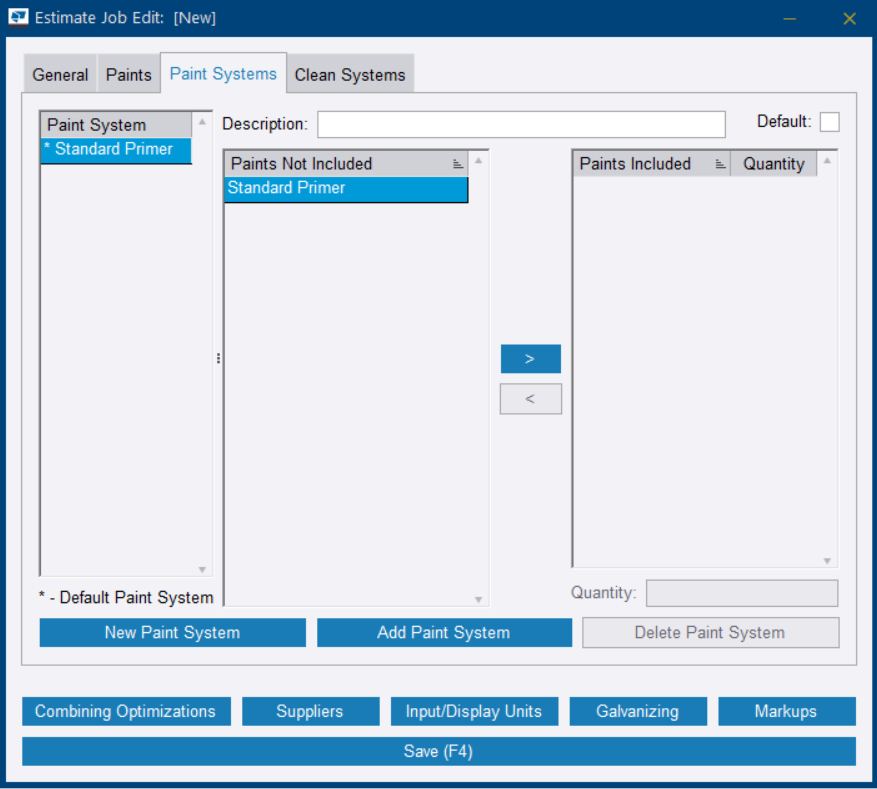
Define paint systems

You can define a default paint system that consists of one or more paint products, for each of which you can define the number of coats needed. When you select a paint system in an estimating job, Tekla PowerFab calculates the applicable costs and adds them to the estimate.

If you do not assign a paint system to the items on the Paint Systems tab, all paints listed on the Paints tab will be applied to all painted items by default.

Note: To use job-specific paint types in paint systems, you first need to define them on the Paints tab in the Estimate Job Edit dialog box.

For information on creating default paint systems, see Manage default paint types and paint systems.

  1. In the Estimate Job Edit dialog box, select the Paint Systems tab.
  2. Click New Paint System.

  3. Add or modify the properties as needed.

    To

    Do this

    Add a new paint system
    1. Click New Paint System.
    2. Type a description for the paint system in the Description field.
    3. Click the arrow buttons to move the paint types that you want to include to the Paints Included list.
    4. To change the number of coats, select an included paint type and type a new value in the Quantity field.
    5. To set the paint system as the default paint system for new estimating jobs, select the Default checkbox.
    6. Click Add Paint System.
    Modify a paint system
    1. Select the paint system in the list.
    2. Change the description, included paints, or the number of paint coats according to your needs.
    3. To set the paint system as the default paint system for new estimating jobs, select the Default checkbox.
    4. Click Save Paint System.
    Delete a paint system
    1. Select the paint system in the list.
    2. Click Delete Paint System.
    3. To permanently delete the paint system, click Yes.
  4. Do either of the following:
    • Click Save.

      The <Module> Job Edit dialog box closes.

    • Continue to add or modify properties.

Define clean systems

You can create and modify job-specific clean systems.

For information on creating default clean systems, see Manage default cleaning types and clean systems.

  1. In the Estimate Job Edit dialog box, select the Clean Systems tab.
  2. Click New Clean System.
  3. Type a description for the cleaning system.
  4. Use the arrow buttons to move the cleaning types that you want to include in the clean system to the Included list.
  5. To add or reduce the times each cleaning type requires, change the value in the Quantity field.
  6. If you only want to apply the cleaning system if cleaning is included in the labor code of the item, select the Check Labor Code For Include Cleaning checkbox.
  7. To set the clean system as the default clean system used for new items, select the Default checkbox.
  8. Click Add Clean System.
Was this helpful?
Previous
Next