New way to edit model object properties
2018
Tekla Structures
New way to edit model object properties
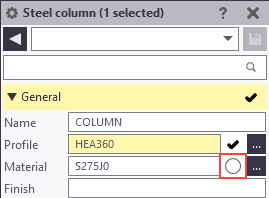
In Tekla Structures 2018 most model objects now have a property pane in the modeling mode. The new property pane replaces the previously used model object properties dialog boxes. You can customize the property pane for each object type.
Property pane offers a new modern and powerful method to handle object properties in Tekla Structures. Property pane is a new side pane window, and all the object properties that previously were available in the dialog boxes are now accessible through the new property pane. Property pane offers a smooth workflow for creating and modifying objects, for saving and loading object properties, and for copying properties between objects.

Previously, the property pane was available only for rebar sets and spiral beams. Now you can use the property pane to view and modify the properties of
- parts, such as columns and beams
- items
- bolts
- welds
- reinforcement
- rebar sets
- pour objects, pour units and pour breaks
- construction objects
- assemblies and cast units
The property pane can be customized. You can select separately for each object type which properties you wish to see in the property pane.
If needed, you can still open the previously used object property dialog boxes using Quick Launch, or by selecting an object and then double-clicking it while holding the Ctrl key pressed.
Main benefits
The new property pane has several benefits compared to the previously used property dialog boxes:
- The property pane is always up-to-date. When you select an object in the model, the current properties are instantly shown in the property pane.
- There is less clutter on the screen because there is no need to have separate dialog boxes open as previously.
- You only need to click Modify to change the selected properties, there is no need to click Apply or OK as previously.
- You can easily create objects that are similar to those objects that you already have in the model: when you select an object in the model, Tekla Structures creates the next similar object using the same properties.
- When you select several objects in the model, you can check if the objects have common properties, what the values of the common properties are, and modify the properties, if needed.
- It is easy to copy properties from one object to another. You can copy properties between any objects as long as both objects have the same property available. For example, you can copy the material from a steel beam to a plate.
- You can easily check which properties you are about to modify in the property pane. Tekla Structures highlights the changed properties in yellow in the property pane and a checkbox appears next to the modified property.
- You can customize the property pane: for example, you can organize the settings as you wish and remove the settings you do not need. You can also add your most needed user-defined attributes (UDAs) directly to the property pane so that you do not need to open a separate UDA dialog box.
How to open the property pane
To open the model object properties in the property pane:
- If the property pane is closed: double-click a model object, or click the Properties icon
 in the side pane.
 - If the property pane is open: select a model object.
Alternatively, hold down Shift and click a command on the ribbon to open the properties in the property pane.
Note that you can have only one property side pane window open at a time. This means that you can view the properties of only one object type at a time. Previously, when you used the dialog boxes, you could have the dialog boxes of several object types open at the same time, for example, concrete slab properties and reinforcement properties. This is not possible with the property pane.
You can float or dock the property pane in the same way as any other side pane window, or drag it around your screen or to your secondary screen, if you have multiple displays.
Modify model object properties
You can view and modify the properties of a one object type at a time in the property pane, or the common properties of several, similar object types.
- Double-click a part, an item, a bolt, a weld, a reinforcement, a pour, a construction object, or an assembly.
The property pane opens, and shows the current properties of the object.
- Modify the properties as needed.
Tekla Structures highlights the modified properties in yellow in the property pane.
- If you want to discard some of the changes, click the check marks next to each setting to remove them.
You can clear the check marks one by one, or select a whole section and all its properties.
You can use the Select All and Select None switches at the bottom of the property pane to select all the changes or to clear all the changes.

- When you are ready with the modifications, click Modify to apply the changes.
The modified properties become the new current properties. Tekla Structures uses the current properties the next time you create an object of the same type.
If you want to create an object using the standard values instead of the new current values, load the standard file first.
Note that if you use the contextual toolbar or direct modification to modify a model object, the current properties do not change and are not automatically applied when you create the next object of the same type.
Modify the common properties of different object types
When you select several similar objects in the model, the property pane shows the properties that are common for all the selected objects. The settings which have several options have the text Varies , and the values or options are shown in a list. If there are no common properties, the property pane is empty.
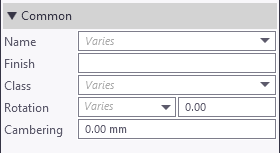
You can modify the common properties in the same way as any other property. Tekla Structures highlights the modified properties in yellow in the property pane, and these properties are applied when you click Modify.
Use the Object type list in the property pane to check which object you have selected in the model and the number of each object type.
| To | Do this |
|---|---|
Check which objects you have selected in the model | Click the Object type list button
The list shows how many objects you have selected for each object type. The list also shows how many components you have selected. If you select Component in the list, the property pane shows the names and numbers of the components that you have selected in the model. Component properties for each component are shown in the same dialog boxes as previously. |
Modify the object selection in the Object type list | Hold down Ctrl and click the object types in the list that you want to exclude or include in the selection. The content of the property pane can change according to your selection. |
Select all the objects in the Object type list | Click the Select all button. |
 to open the list of the selected objects.
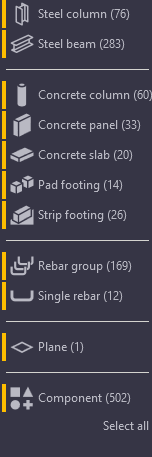
Copy object properties from one object to another (Apply)
You can use the property pane to easily copy properties between any objects as long as both of the objects have the same property available.
- Select the object you want to copy properties from.
- Click
 Copy properties in the property pane.
The mouse pointer changes into a paintbrush.
- Select the objects you want to copy properties to. You can use area select to the select the objects.
Tekla Structures highlights the modified properties in yellow in the property pane.
- Select or clear the check marks to indicate which properties you want to copy.
You can clear the check marks one by one, or select a whole section and all its properties.
Use the Select All and Select None switches at the bottom of the property pane to select all the changes or to clear all the changes. If you use the Select None switch, all check marks will be cleared the next time you start the Copy properties command.
- Click Modify to apply the selected changes.
The modified properties become the new current properties. Tekla Structures uses the current properties the next time you create an object of the same type.
When the properties have been copied, the mouse pointer returns to normal.
Note that if you have customized the property pane and added user-defined attributes (UDAs) to it, the values of the UDAs are copied when you use the Copy properties command in the property pane. Values of the UDAs that are visible only in the UDA dialog boxes are not copied with the object. Unique user-defined attributes ( unique_attribute ) are not copied with the object.
Note that if you copy rebar set or leg face properties, the layer order number is not copied.
Tip:
To copy properties to multiple objects, double-click theCopy properties button to keep the Copy properties command running. Click Modify after each selected object. The mouse pointer remains in the paintbrush mode until you press Esc or click again.
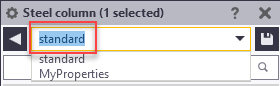
Use property files and standard files
You can save sets of properties as property files, and load these properties later when you create new objects.
- Double-click a part, an item, a bolt, a weld, a reinforcement, a pour, a construction object, or an assembly to view the current properties in the property pane.
- In the property pane, modify or enter the properties you want to save.
- In the box next to the
 button, enter a name for the new set of properties.
 - Clickto save the properties.
The set of properties is now saved and added to the list of property files in the current model folder:
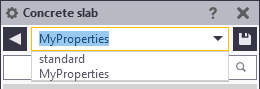
- When you want to load the properties, select the set of properties from the list.
- If you select an object in the model and load a property file in the property pane, the properties and the user-defined attributes (UDAs) are loaded immediately, and the values that are different from the currently selected object are highlighted in yellow in the property pane. Click Modify to apply the new values.
If there are changes only in the UDA values in the UDA dialog box and not the in the values in the property pane, the Modify button does not become active. Click Modify in the UDA dialog box to active the UDA values.
- If you start an object creation command in the model and load a property file in the property pane, the properties and the user-defined attributes (UDAs) are used right away and Tekla Structures creates the object using the loaded values.
Note:If the UDA dialog box is open when you load a property file in the property pane, the UDA dialog box updates and shows the values of the UDAs that are saved in the property file. However, if you first select an object and load a property file and only then open the UDA dialog box, the dialog box shows the UDA values of the selected object.
To check which UDA values are saved in a property file, you need to open the UDA dialog box first, or load the property file again after opening the UDA dialog box.
- If you select an object in the model and load a property file in the property pane, the properties and the user-defined attributes (UDAs) are loaded immediately, and the values that are different from the currently selected object are highlighted in yellow in the property pane. Click Modify to apply the new values.
- If you want to make changes to an existing set of properties:
- Load the set of properties you want to change.
- Modify the properties.
- Click.
Tekla Structures saves the changes in the file shown in the list, overwriting the old set of properties.
The modified properties become the new current properties. Tekla Structures uses the current properties the next time you create an object of the same type.
If you want to create an object using the standard values instead of the new current values, load the standard file first.
User-defined attributes in the property pane
In the property pane, the More button in the Custom properties section opens the user-defined attributes (UDAs) dialog box. If you customize the property pane, you can add your most important UDAs directly to the property pane, so that you do not need to open separate UDA dialog boxes.
When you create or modify model objects, UDAs are automatically applied together with all the other object properties. UDAs are automatically applied regardless of them being in the property pane or in the UDA dialog boxes.
UDAs with the following unit types are supported and work correctly in the property pane: Option , String , Integer , Float , Date , Distance , Weight , Force , Moment , Angle , Factor , and Area. UDAs with other unit types need to be used through the UDA dialog boxes.
Customize the property pane layout
You can customize the property pane to better suit your needs. You can select separately for each object type which properties you wish to see in the property pane. With the customization tool you can show, hide and organize the settings in the property pane. You can also add your most needed user-defined attributes (UDAs) directly to the property pane. Company administrators can distribute the customized property pane layouts to the whole organization, in the same way as customized ribbon or customized tabs.
With the customization tool, you can
- organize properties to a suitable order or to suitable groups
- remove properties you do not use or need
- create your own groups for properties that you find relevant, including user-defined attributes (UDAs)
- add properties to an existing group, including user-defined attributes (UDAs)
- create nested property groups
- rename properties or groups
- save the customized property pane layouts

The customized property pane layouts are saved to the PropertyTemplates.xml file in the ..Users\<user>\AppData\Local\Trimble\TeklaStructures\<version>\UI\PropertyTemplates\ folder.
To open the customization tool, click .
In the Properties for list, select the object type whose property pane layout you want to modify. For example, Concrete slab.
- The left side of the customization tools shows the available properties and user-defined attributes for each object type. You can add these properties and UDAs to the property pane layout as regular properties. Properties which are already in use cannot be added for a second time but you can reorganize them in the property pane layout.
- The right side of the customization tool shows the current layout of the property pane for the selected object type.
| To | Do this |
|---|---|
| Add a new property to the property pane layout | Select a property from the list on the left and drag it to the property pane layout on the right. You can drag the property to any group on the property pane. |
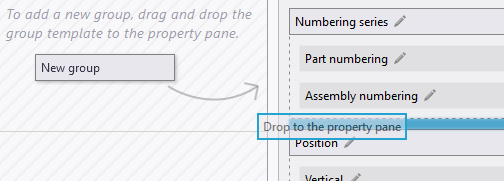
| Add a new group to the property pane layout | Drag the group template from the middle section of the customization tool to the property pane layout on the right. You can create a new group, or insert a new group inside an existing group to create nested groups. You can reorganize the existing groups by dragging them. |
| Rename a group or a property | Click Alternatively, right-click the group or the property name and select Rename. |
| Copy a group from one object type to another object type | You can copy groups from one object type to another object type, for example, from steel beam to steel plate.
If you copy nested groups, all the nested groups inside the main group are copied, too. Note that properties that are already in use cannot be added for a second time. If you copy a group containing properties that are already in use, the copying does not succeed and the customization tool status bar displays a message describing the details. |
| Delete a group or a property | Right-click a group or a property, and select Delete. |
| Revert back to the original property pane layouts | Click the Remove this customization button to remove the customization of a single property pane layout, or the Remove all customizations button to remove the customization of all property pane layouts. |
| Discard changes | On the Edit property pane tab, click the Discard button |
| Save the changes | On the Edit property pane tab, click the Save button When you return to Tekla Structures , Tekla Structures asks if you wish to reload the changed property pane templates. Click Yes to take the customized property pane layout in use. |
 to undo the last action.
Example: How to add IFC related user-defined attributes to the property pane layout
This example shows how to add IFC related user-defined attributes (UDAs) to the steel column property pane layout, and copy the group to the steel beam property pane layout.
In the Properties for list, select Steel column.

Create a new property group. Drag the group template to the property pane layout on the right.
Click
 and rename the property group to IFC.
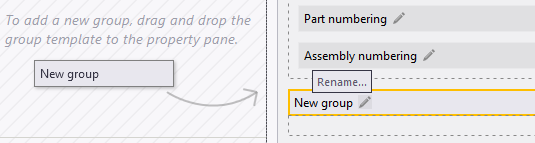

In the search box on the left, search the IFC related UDAs.

Drag the UDAs one by one to the group you created in the property pane layout.


When you have added all the needed UDAs to the new group, copy the group and add it to the steel beam property pane layout. Right-click the group and select Copy properties.

The name of the copied group and the content of the group is shown in the middle of the customization tool.
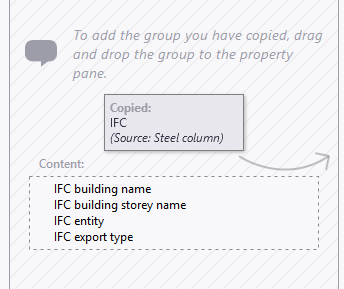
To add the copied group in the steel beam property pane layout, select Steel beam in the Properties for list.
Drag the copied group from the middle of the customization tool to the steel beam property pane layout on the right.

Now the IFC related UDAs are available both in the steel column property pane layout and in the steel beam property pane layout.

On the Edit property pane tab, click the Save button
 to save the changes. When you return to Tekla Structures , Tekla Structures asks if you wish to reload the changed property pane templates. Click Yes to take the customized property pane layout in use.
Distribute customized property pane layouts using a project, firm, or environment folder
Company administrators can distribute the customized property pane layouts to other users in the company by placing the property pane layout file PropertyTemplates.xml in a folder called PropertyRepository\Templates in a project, firm, or environment folder. For example, company administrators can create company property pane layouts and save them in the firm folder. These property panes are available in the Tekla Structures user interface for all users who use the same firm folder.
Note:
If you use a firm folder to distribute the PropertyTemplates.xml file, you need to set the firm folder path in an .ini file. If you set the firm folder path in the advanced option XS_FIRM , the PropertyTemplates.xml file does not work correctly.
Add a property pane layout file to a project, firm, or environment folder
- In the customization tool, create the property pane layouts that you want to share.
The property pane layouts are saved in the PropertyTemplates.xml file, in the ..\Users\<user>\AppData\Local\Trimble\TeklaStructures\<version>\UI\PropertyTemplates folder.
- Create a folder called PropertyRepository\Templates either in your company's project folder, firm folder, or in the \system folder, which is located under the environment folder: ..\ProgramData\Tekla Structures\<version>\Environments\<environment>\system.
- Copy the PropertyTemplates.xml file to the PropertyRepository\Templates folder.
For example: ..\ProgramData\Tekla Structures\<version>\Environments\<environment>\system\PropertyRepository\Templates\PropertyTemplates.xml.
- Restart Tekla Structures.
Search order of the customized property pane layout files
The PropertyTemplates.xml file contains all the property pane layouts for different object types. Note that the property pane layouts for different object types are treated separately. For example, Tekla Structures can read the property pane layout for steel beam from a different location than the property pane layout for steel column.
If different object types are defined in different folder locations, the definitions are combined. If the same object type is defined differently in different folder locations, the definition that is higher in the search order is used.
The property pane layout in the ..\Users\<user>\AppData\Local\Trimble\TeklaStructures\<version>\UI\PropertyTemplates\ folder has the highest priority, and after that Tekla Structures uses the default search order.