Modify a rebar set locally using modifiers
2019
Tekla Structures
Modify a rebar set locally using modifiers
You can use modifiers to modify a rebar set at certain locations only.
For example, you can create a local property modifier to only change the properties of certain bars in a rebar set, or you can create hooks or threading by adding an end detail modifier , or you can split rebar set bars with a splitter.
You can also create secondary guidelines for the rebar set. With a secondary guideline you can define a different spacing at the start and end of the rebar set bars, for example.
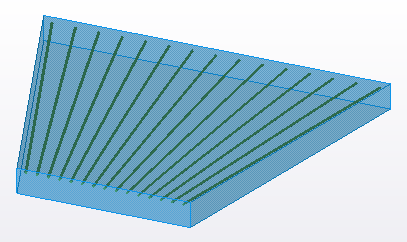
Modifiers are lines, or polylines that may have corner chamfers. Modifiers are projected to rebar set leg faces. Each modifier then only affects the rebar set bars that its projection touches.
Note:
When you work with rebar sets, ensure that the Direct modification switch is active.
To select entire rebar sets, or bar groups or individual bars within rebar sets in the model, you can use the three reinforcement selection switches . Tekla Structures then shows the existing modifiers that affect the selected rebar set bars, and the direct modification handles of the modifiers. Different modifiers have different colors as follows:
| Modifier | Color | Example |
|---|---|---|
| Property modifier | Light green |  |
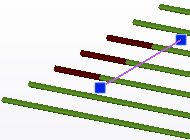
| End detail modifier | Magenta |  |
| Splitter | Orange | 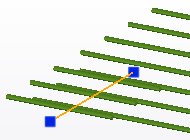 |
| Secondary guideline | Light blue | 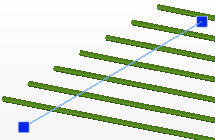 |
An arrowhead symbol close to the midpoint of each modifier indicates the direction of the modifier, pointing from the start towards the end of the modifier.
When you select a modifier, Tekla Structures indicates the rebar set bars that are affected by the modifier, and shows the other, unaffected bars as semi-transparent.
You can modify the modifiers by using direct modification, or by changing their properties in the property pane or on the contextual toolbar. When you change the modifier properties, the properties of the rebar set bars change at the location defined by the modifier.
When you delete a modifier, the rebar set reverts to the state it had without the modifier.
Create a property modifier
Property modifiers are shown in light green.
- Using the reinforcement selection switches, select the rebar set bars for which you want to create the modifier.
- On the Rebar set contextual tab on the ribbon, click
 Property modifier.
 - Define how you want to place the modifier in the model.
Click the Picking mode button on the contextual tab to cycle through the picking modes and to select the picking mode.
The
 button indicates that you can pick one point, and the
 button indicates that you can pick multiple points. The
 button indicates that the modifier will be created for the selected bars only.
Create an end detail modifier
End detail modifiers affect the nearest end of the bar, so by moving the modifier you can change the bar end that it affects. End detail modifiers are shown in magenta.
Tekla Structures displays the threaded bar ends in dark red.
- Using the reinforcement selection switches, select the rebar set bars for which you want to create the modifier.
- On the Rebar set contextual tab on the ribbon, click
 End detail.
 - Define how you want to place the modifier in the model.
Click the Picking mode button on the contextual tab to cycle through the picking modes and to select the picking mode.
The
button indicates that you can pick one point, and thebutton indicates that you can pick multiple points. Thebutton indicates that the modifier will be created for the selected bars only.
Create a splitter
Splitters split bars and create lap or crank splices. Splitters are shown in orange.
- Using the reinforcement selection switches, select the rebar set bars for which you want to create the modifier.
- On the Rebar set contextual tab on the ribbon, click
 Splitter.
 - Define how you want to place the splitter in the model.
Click the Picking mode button on the contextual tab to cycle through the picking modes and to select the picking mode.
The
button indicates that you can pick one point, and thebutton indicates that you can pick multiple points. Thebutton indicates that the splitter will be created for the selected bars only.
Create a secondary guideline
You can create up to two secondary guidelines for a rebar set. Secondary guidelines are shown in light blue.
- On the Rebar set contextual tab on the ribbon, click
 Secondary guideline.
 - Define how you want to place the guideline in the model.
The
button on the contextual tab indicates that you can pick one point, and thebutton indicates that you can pick multiple points. Click the button to change the picking mode. - To create another secondary guideline, repeat steps 3 and 4.
If there are already two secondary guidelines in a rebar set, the tooltip of the
button changes to Maximum number of secondary guidelines reached and you cannot create more guidelines. - If needed, select a secondary guideline and modify its geometry and properties.
For example, you can adjust the secondary guideline's length or spacing values.

See also Distribute bars in a rebar set.
- To set a secondary guideline as the primary guideline, select the secondary guideline and click
 Set as primary on the contextual toolbar.
Tip:
Alternatively, you can create secondary guidelines the same way as you copy other modifiers : hold down Ctrl and drag the primary guideline.
Create a modifier by copying
You can copy rebar set modifiers.
Show or hide rebar set modifiers
If you have many rebar set modifiers in your model, it may be useful to only show some of them at a time and hide the ones that are not currently needed. You can show and hide modifiers according to their type.
For example, you can show the end detail modifiers only, and hide all property modifiers and splitters.
- Go to the Concrete tab and click Rebar display options.
- Do any of the following:
- Click Property modifier visibility to switch the property modifiers on or off.
- Click End detail modifier visibility to switch the end detail modifiers on or off.
- Click Splitter visibility to switch the splitters on or off.
Alternatively, you can use the following advanced options: