Customize the property pane layout
2018
Tekla Structures
Customize the property pane layout
Tekla Structures shows the properties of most model objects in the property pane. You can customize the property pane to better suit your needs. You can select separately for each object type which properties you wish to see in the property pane. With the customization tool you can show, hide and organize the settings in the property pane. You can also add your most needed user-defined attributes (UDAs) directly to the property pane.
Company administrators can distribute the customized property pane layouts to the whole organization, in the same way as customized ribbons or customized tabs.
To open the customization tool, click .
With the customization tool, you can
- organize properties to a suitable order or to suitable groups
- remove properties you do not use or need
- create your own groups for properties that you find relevant, including user-defined attributes (UDAs)
- add properties to an existing group, including user-defined attributes (UDAs)
- create nested property groups
- rename properties or groups
- save the customized property pane layouts

The customized property pane layouts are saved to the PropertyTemplates.xml file in the ..Users\<user>\AppData\Local\Trimble\TeklaStructures\<version>\UI\PropertyTemplates\ folder.
Add properties to a property pane layout
To open the customization tool, click .
In the Properties for list, select the object type whose property pane layout you want to modify. For example, Concrete slab.
- The left side of the customization tools shows the available properties and user-defined attributes for each object type. You can add these properties and UDAs to the property pane layout as regular properties. Properties which are already in use cannot be added for a second time but you can reorganize them in the property pane layout.
- The right side of the customization tool shows the current layout of the property pane for the selected object type.
| To | Do this |
|---|---|
| Add a new property to the property pane layout | Select a property from the list on the left and drag it to the property pane layout on the right. You can drag the property to any group on the property pane. |
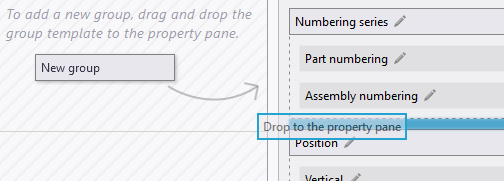
| Add a new group to the property pane layout | Drag the group template from the middle section of the customization tool to the property pane layout on the right. You can create a new group, or insert a new group inside an existing group to create nested groups. You can reorganize the existing groups by dragging them. |
| Rename a group or a property | Click Alternatively, right-click the group or the property name and select Rename. |
| Copy a group from one object type to another object type | You can copy groups from one object type to another object type, for example, from steel beam to steel plate.
If you copy nested groups, all the nested groups inside the main group are copied, too. Note that properties that are already in use cannot be added for a second time. If you copy a group containing properties that are already in use, the copying does not succeed and the customization tool status bar displays a message describing the details. |
| Delete a group or a property | Right-click a group or a property, and select Delete. |
| Revert back to the original property pane layouts | Click the Remove this customization button to remove the customization of a single property pane layout, or the Remove all customizations button to remove the customization of all property pane layouts. |
| Discard changes | On the Edit property pane tab, click the Discard button |
| Save changes | On the Edit property pane tab, click the Save button When you return to Tekla Structures , Tekla Structures asks if you wish to reload the changed property pane templates. Click Yes to take the customized property pane layout in use. |
 to undo the last action.
User-defined attributes (UDAs) in the customized property pane
In the property pane, the More button in the Custom properties section opens the user-defined attributes (UDAs) dialog box. If you customize the property pane, you can add your most important UDAs directly to the property pane, so that you do not need to open separate UDA dialog boxes.
When you create or modify model objects, UDAs are automatically applied together with all the other object properties. UDAs are automatically applied regardless of them being in the property pane or in the UDA dialog boxes.
UDAs with the following unit types are supported and work correctly if they are added in the property pane: Option , String , Integer , Float , Date , Distance , Weight , Force , Moment , Angle , Factor , and Area. UDAs with other unit types need to be used through the UDA dialog boxes.
Example: How to add IFC related user-defined attributes to the property pane layout
This example shows how to add a group of IFC related user-defined attributes (UDAs) to the steel column property pane layout, and copy the group to the steel beam property pane layout.
- In the Properties for list, select Steel column.

- Create a new property group. Drag the group template to the property pane layout on the right.
- Click
 and rename the property group to IFC.
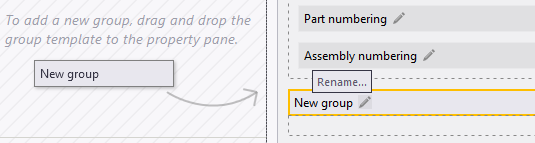

- In the search box on the left, search the IFC related UDAs.

- Drag the UDAs one by one to the group you created in the property pane layout.


- When you have added all the needed UDAs to the new group, copy the group and add it to the steel beam property pane layout. Right-click the group and select Copy properties.

The name of the copied group and the content of the group is shown in the middle of the customization tool.
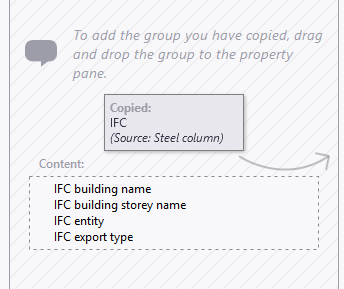
- Drag the copied group from the middle of the customization tool to the steel beam property pane layout on the right.

Now the IFC related UDAs are available both in the steel column property pane layout and in the steel beam property pane layout.

- On the Edit property pane tab, click the Save button
 to save the changes. When you return to Tekla Structures , Tekla Structures asks if you wish to reload the changed property pane templates. Click Yes to take the customized property pane layout in use.