This
example shows how to produce a template that shows the hierarchical structure of nested
assemblies.
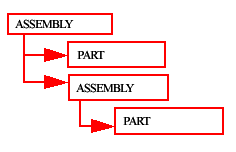
These steps show how to create a nested assembly structure in a textual template
similar to the one in this picture:
-
On the
File menu, click
.
-
In the Template
Editor, click File > New.
-
Select
Textual template, then click OK.
-
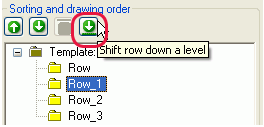
Add four new rows in the template.
-
To add a new row,
click .
-
Select a content type for the row, then click
OK.
For the first and third row, select the
ASSEMBLY content type. For the second and
fourth row, select the PART content type.
-
Use the arrow buttons under
Sorting and drawing order to create a nested assembly structure for the template.
-
Move the second and third row down one level.
-
Move the fourth row down two levels.
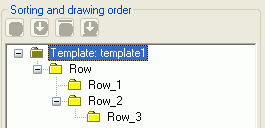
The structure should now look like this:
-
Add value fields to get the required data from your Tekla Structures database.
In this example, the added value fields are assembly or part position, number, and weight.
-
Click
.
-
Click a point to define the location of the field within the row.
The
Select Attribute dialog box open and prompts you to select an
attribute for the value field.
-
Select an
attribute, then click OK.
-
Modify the layout of the template. For example:
-
Move objects to show the nested assembly structure in the printed
report.
Select the object that you want to move and drag it to the new
position.
-
Align objects.
Select the objects that you want to align, right-click, then select
an alignment option. For example, select .
-
Add a header and a footer.
Click and .
Add the required information to the header and footer.
-
Save the template.
Example
This example shows a textual template and a report
that has been created using the template:
Note:
You can create graphical templates for nested
assemblies in the same manner as textual templates. The difference between
graphical and textual templates is that in a graphical template you can show
project and company information and graphics, such as table outlines, pictures,
or symbols.
