5. ProNest Inventory Import
Not version-specific
Tekla PowerFab
Tekla PowerFab GO
Import Inventory from ProNest
On occasion, when first beginning to use the integration from PowerFab to ProNest, or when some nesting has been performed in ProNest outside of the integration, ProNest may contain inventory and remnants that did not originate through the integration. Follow these steps to bring that inventory in to PowerFab and make it available to the integration for use in nesting.
Export Inventory From ProNest
- From ProNest, open the Plate Inventory.
- Select plates to import to PowerFab (plates not selected will not be included).
Image

- Choose File → Print.
Image

- You'll see a Print Preview-type screen. Click the Save button at the top (diskette image) and select "HTML file...".
Image

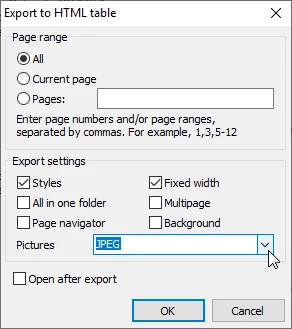
- Make sure Pictures is set to JPEG and click OK.
Image
- It will prompt you to save the file. By default, it's called PlateInv.html
Import Inventory to Tekla PowerFab
- Open PowerFab Inventory, and Choose Inventory->Import->Inventory from HTML from the menu.
Image

- Select the file created by ProNest.
Image

The inventory will be added to PowerFab and a link created from PowerFab to ProNest so that this piece can be used in nests. Inventory items that are detected as already present within PowerFab will be updated, but the quantity will not be decreased.
RETURN NEXT