Bind parts to grid levels
You can now bind steel and concrete parts to various z-direction elevations that are taken from the project grids. During the early conceptual phase, frequent changes in part levels along the z-direction can be time-consuming to adjust manually. By linking parts directly to defined grid elevations, manual work and errors are minimized and the accuracy in the modeling process is improved. If there are any changes in the part levels in the z-direction, all bound parts update to match the new z-direction elevation. This ensures that any changes to grid levels or story elevations, if you are using building hierarchy, automatically reposition the bound parts.
For example, if the z-coordinate increases by 1 meter, the height of the bound object is automatically adjusted by the same amount. Bindings can be further refined with positive or negative offset values that correspond to the bound levels. Additionally, you have the flexibility to adjust, add, remove, or rename levels as needed. To find the bound parts in a model, you can create a filter or a report, and once the bindings are not needed anymore, you can unbind all bound parts at once.
Parts are bound to grid levels in the following ways:
| Part | How the part is bound |
|---|---|
|
Columns and walls |
Bind to grid levels from the top and bottom part face. |
|
Beams and polybeams |
Bind to grid levels from the start and end points of the part. Note: When start and end points of a polybeam are bound, any intermediate points scale proportionally to maintain the relative geometry of the polybeam. |
|
Slabs, footings, and plates |
Bind to a single level from the top face only. |
To bind parts to grid levels:
-
Start by ensuring your grids are suitably named.
This will help you to identify different grids and make it easier to select the correct level for a part in question.
-
In the grid properties, go to the Name property to name the grid.
When a new grid is created, the grids get automatically named to GRID, GRID 1, and so on.
-
Change the current grid name if needed.
-
-
Bind a part to a selected grid level.
-
Select a part in the model that you want to bind to a grid level.
-
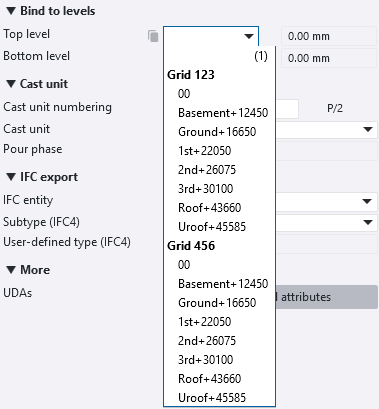
In the properties of the selected part, go to the Bind to levels property.
-
Select the grid level to which you want to bind the selected part.
You can bind the selected part fully or partially. If you bind the part only partially, leave the other end unbound. This allows you to manually set the position value for that end.
- For a column or wall, you can bind either the top or bottom part face using the Top level and Bottom level options.
-
For a beam or polybeam, you can bind either the start or end point using the Start level and End level options.
For polybeams:
- If you enter only one point, the second point will either stay unbound if left empty, or be set based on the picked point's coordinate.
- When the polybeam start and end points are bound, any intermediate points scale proportionally to maintain the relative geometry of the polybeam.
- When you have a flat polybeam, where the start and end level are the same, the polybeam stays flat even when the levels change, and all the intermediate points move together by the same amount.
- For a plate, a slab, or a footing, you can only bind the top face to a single level using the Level option.
-
If needed, you can enter a positive or negative offset value to refine the position of the bound end relative to the level.
-
Click Modify to set the binding.
If you resize or reshape the bound parts
If you later use direct modification to modify the part, the part will not be unbound from its level. Instead, changes made using direct modification or changing the part profile adjust the offset value relative to the bound level.
If you copy or move the bound parts
-
If you move a part and its new z-coordinates align with the z-level grid, its top and bottom levels are updated to these new z-levels. This only works if the new level difference matches the original difference.
-
If only one end of the part, either top or bottom, aligns with the new z-level, that end connects to the new level and the other end is unbound.
-
If the part is positioned between levels and the new level difference does not match the original, the part loses its binding and returns to its original position.
-
If the part moves to a position without any z-level match, the part loses its binding and returns to its default position.
Note that building hierarchy works the same way when you change a building story's height.
-
-
-
Once the objects are bound to levels, you can use the new
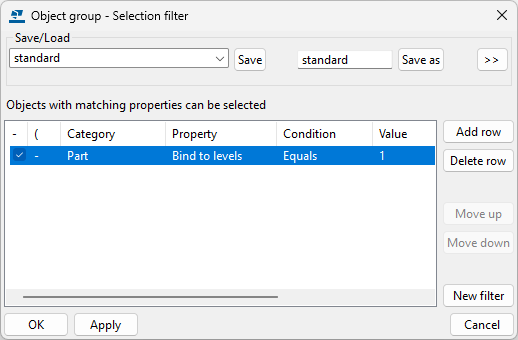
BIND_TO_LEVELStemplate attribute in reports to report on all bound objects in your model.To filter parts based on whether or not they are bound to levels, in the Object group - Selection filter, use the new property Bind to levels in the Part category.
-
When you do not need the bindings anymore, you can remove the bindings. Select an empty value in the list of levels in the property pane, or click and select Unbind all or Unbind selected objects from levels.
TTSD-69544
If you are a Tekla Structures administrator
If you manage Tekla Structures settings for other users, update customized settings for users.
Update the ribbon for unbind objects from levels
If you have customized the ribbon, update your customized ribbon to add buttons for Unbind all and Unbind selected objects from levels commands.
-
On the Edit tab, under Parametric modeling, add the new Unbind all and Unbind selected objects from levels buttons.
-
Add ribbon item: Simple button
-
Command: Modeling.UnbindAllObjects and Modeling UnbindSelectedObjects.
-
Appearance: Command: Scalable icon
-
Text: Command: Full text
-
-
Save the changes.
The new ribbon configuration file is saved to ..\Users\<username>\AppData\Local\Trimble\Tekla Structures\2026.0\UI\Ribbons.
-
Move the file to the Ribbons sub-folder in a folder that is in the XS_SYSTEM path.
Update the property pane for bind objects to levels
If you have customized the property pane, update your customized property pane to add a new property group Bind to levels and a new property Name.
Add the Bind to levels property group to the property pane layout for the following model objects:
- ConcreteSlab
- ConcreteColumn
- ConcreteBeam
- ConcretePanel
- PadFooting
- StripFooting
- SteelColumn
- SteelBeam
- ContourPlate
Add the Name property to the property pane layout for the following objects:
- RectangularGrid
- RadialGrid
-
In the PropertyTemplates.xml file, add a new property group for Bind to levels below the Position property group for each above mentioned object type. Add the following:
<PropertyGroup Name="BindToLevels" Label="translation:albl_Bind_to_levels" Tooltip="translation:albl_Bind_to_levels"> <Property Name="Property.BindToLevel"/> </PropertyGroup> -
In the PropertyTemplates.xml file, add the Name property above the UDAs property for each above mentioned object. Add the following:
<Property Name="Property.Grid.Name" />