Colors in drawings
You have three basic color modes for line colors in drawings: Black and white, Grayscale, and Color.
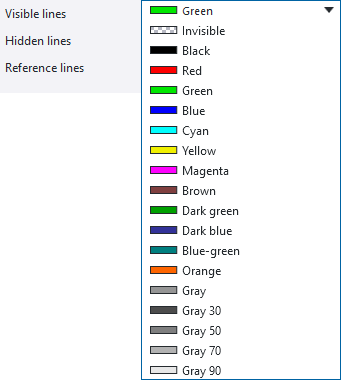
Colors available in drawings
The table below shows the basic colors available in Tekla Structures drawings, and how the different colors are shown in black and white drawings and in grayscale drawings. The corresponding pen numbers referring to the line width used in the printed drawings are listed in the Pen column.
Some of the different gray shades are true colors in the way that they will keep their color regardless of the drawing color mode, all the way to printing.
|
Name |
Pen |
Tekla Structures color |
Black and white |
Gray scale |
Lightness |
|---|---|---|---|---|---|
|
Invisible |
9 |
|
|
|
Invisible |
|
Black |
7 |
|
|
|
0% |
|
Red |
1 |
|
|
|
0% |
|
Green |
3 |
|
|
|
0% |
|
Blue |
5 |
|
|
|
0% |
|
Cyan |
4 |
|
|
|
0% |
|
Yellow |
2 |
|
|
|
0% |
|
Magenta |
6 |
|
|
|
0% |
|
Brown |
15 |
|
|
|
30% |
|
Dark green |
110 |
|
|
|
50% |
|
Dark blue |
141 |
|
|
|
70% |
|
Blue-green |
111 |
|
|
|
90% |
|
Orange |
31 |
|
|
|
100% white |
|
Gray |
8 |
|
|
|
60% |
|
Gray 30 |
251 |
|
|
|
30% |
|
Gray 50 |
252 |
|
|
|
50% |
|
Gray 70 |
253 |
|
|
|
70% |
|
Gray 90 |
254 |
|
|
|
90% |
|
Special |
- |
|
|
|
- |


You can select the color for a line in the drawing object properties. In the property pane, the color names are also indicated.
Colors in drawing hatches (fills)
You can select the color for a hatch (fill) in part and shape properties on the Fill tab after you have selected a fill type from the Type list.
The true gray shades are marked with red in the image below.
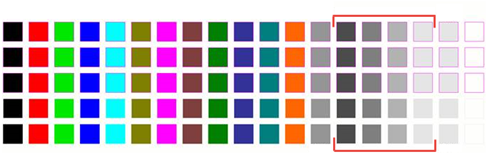
The gray scale colors (130 - 133) are also available for automatic hatches.
Color modes in drawings
You have three basic color modes for line colors in drawings: Black and white, Grayscale, and Color.
Color is the default color mode. To change the default color mode in drawings when Tekla Structures is started, use the XS_USE_COLOR_DRAWINGS advanced option.
In addition to the three basic color modes, you can have a black background and colored lines in drawings (advanced option XS_BLACK_DRAWING_BACKGROUND).
In addition to the actual colors, you can specify a special color that is not converted to black in printouts. For more information, see "Specify a special color for printing" later in this article.
Note that the drawing color mode does not affect the colors in the printouts, you can select the printing color on the Options tab in the Print Drawings dialog box. You can change the line width of the colors on the Line properties tab in the Print Drawings dialog box. This setting affects the line width in printouts, and also the line width on the screen in black and white color mode. To also show the defined line width on the screen in color and grayscale modes, go to , and select the Printer line widths check box. In the printing preview, the actual line widths are shown in all modes.
Color
The Color mode does not show different line widths by default. To show the line widths defined in the Print Drawings dialog box on the screen, go to , and select Printer line widths.
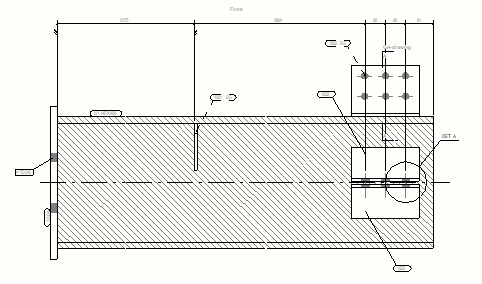
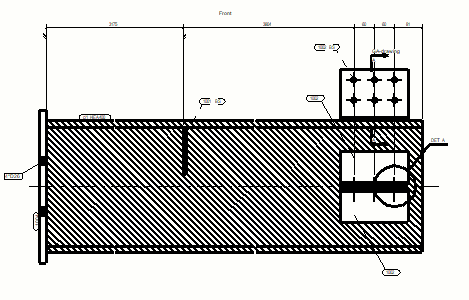
Below is an example of a drawing in the Color mode.

Grayscale
In the Grayscale mode, the colors from 1 to 7 (black, red, green, blue, cyan, yellow, magenta) are shown in black, and the colors from 8 to 14 (brown, dark green, dark blue, blue-green, orange, gray) are shown in different shades of gray.
The Grayscale mode does not show different line widths by default. To show the line widths defined in the Print Drawings dialog box on the screen, go to , and select Printer line widths.
Below is an example of a drawing in the Grayscale mode.
Black and white
The Black and white mode shows different line widths by default.
Below is an example of a drawing in the Black and white mode.
Change drawing color mode
You can change the color mode of the drawings.
Specify a special color for printing
You can define a special color that is not converted to black when printed. This color will be printed as color or grayscale, depending on the selected printer settings. The special color is defined using RGB (Red Green Blue) values in a scale of 0 to 255. The special color is applied on parts or sketch objects as a hatch.