Troubleshoot pours
When you work with cast-in-place concrete parts, it is important that you regularly check the resulting pour objects, and try to get rid of the errors related to them, before you start detailing, or creating drawings and reports. The errors in solid pour objects may lead to inaccuracies in volume and other quantity calculations, and to incorrect representation and hatching in drawings.
While you model, use the following methods to check the model for pour-related errors:
- Check if there are
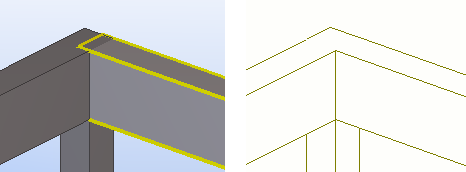
Solid errorrows in the session history log file. - Ensure that the cast-in-place concrete parts and pour objects look continuous in model views. They should not have part outlines or shadow lines inside them, like in the following images:


If you notice errors or overlapping volumes or faces, try remodeling some of the parts.
You can also try out the following tips to avoid pour-related errors:
- Make sure that the number of parts included in a single pour object is reasonable.
- Sometimes modeling the parts in a different order may fix errors in pour objects.
- To control which lines are visible in drawings, use the advanced options
XS_DRAW_CAST_PHASE_INTERNAL_LINES and
XS_DRAW_CAST_UNIT_INTERNAL_LINES.
This may help because the cast-in-place concrete parts that have errors are treated in the same way in drawings as the precast concrete parts.
If remodeling the parts does not fix errors in solid pour objects, then overlap the parts as little as possible to ensure that the volume and quantity calculations are close to the correct values.
Example: Identify and fix a pour error
This is how an error related to a solid pour object can be indicated in a model view and in a drawing. The pour object is not shown as continuous, and there are extra lines between the parts in the pour object:

Checking the
session history log file and clicking a
Solid failure position row helps you to locate the error in the model (press
Ctrl+2 to see through the parts):

Try moving a beam end so that it is no longer on the same surface as the column side:

This is how the model and the drawing look like after you have fixed the model:

Also the volume of the pour object is now correct, for example, in reports. The overlapping volume of the beam and the column is only counted once.