Merge marks automatically
You can let Tekla Structures automatically merge marks.
You can automatically merge:
- Part marks and surface treatment marks
- Reinforcement marks
For more information about mark properties, including merging settings, see Mark properties - Content, General, Merging and Appearance tabs.
You can also merge marks manually. For more information, see Merge marks.
Merged part marks
A merged part mark means that you have only one part mark for similar parts in a drawing, instead of a separate mark for each of the parts. Merged part marks indicate the number of included parts, and contain the defined part mark contents, and the near side and far side information. The marks are merged only in X direction of the main part.
Tekla Structures merges marks for visible parts in drawings if:
-
The secondary parts are welded or bolted to the same main part.
-
The parts are on the same line.
-
Distances between the parts are equal.
-
The parts have the same part position.
-
Distance between parts is not more than what is set for the advanced option
XS_PART_MERGE_MAX_DISTANCE. -
There are at least as many parts in the array as it has been set for the advanced option
XS_MIN_MERGE_PART_COUNT.
Limitations
-
You cannot merge part marks (assembly marks) that are not part of the same assembly.
-
Tekla Structures does not merge neighbor part marks.
Advanced options in merging marks
In merging part marks, you may find the following advanced options useful:
XS_MULTIPLIER_SEPARATOR_FOR_MERGED_PART_MARK
XS_NSFS_POSTFIX_FOR_MERGED_PART_MARK
XS_NS_POSTFIX_FOR_MERGED_PART_MARK
XS_FS_POSTFIX_FOR_MERGED_PART_MARK
Example
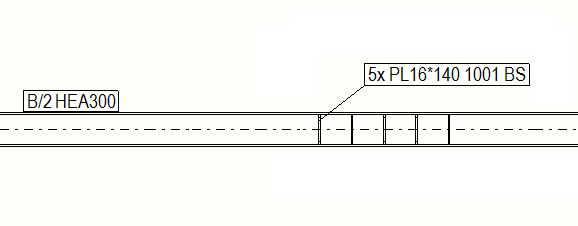
In the example below, the part marks are merged in X direction of the HEA300 beam (main part).

In the example below, the leftmost part marks are not merged, because they are too far from each other.

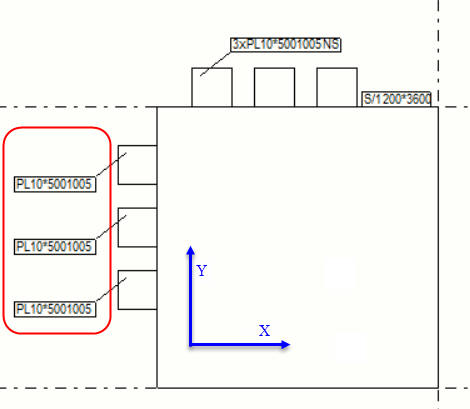
In the example below, the marks in the Y direction are not merged, because the marks are merged only in X direction (which in this example is horizontal).

Merge part marks automatically
You can merge part marks and surface treatment marks automatically to reduce the number of marks in the drawing.
Tekla Structures merges marks for identical secondary parts on both faces of main parts.
Merged reinforcement marks
Tekla Structures can automatically merge similar reinforcement marks of bars, and you can also merge reinforcement marks manually. Merged reinforcement marks may include several blocks, and additional information. Blocks combine similar single marks.
To have Tekla Structures automatically merge reinforcement marks in drawings, the reinforcement must be attached to a concrete part or cast unit in the model.
Tekla Structures automatically merges marks for visible reinforcing bars in drawings if:
-
The bars belong to the same concrete part or cast unit.
-
The direction of the bars is the same.
-
The bar marks are identical.
-
The bars are close to each other.
-
A straight line can be drawn through all the bars.
You can also define the distance within which to automatically merge marks for visible reinforcing bars using the following advanced options:
Merge reinforcement marks automatically
You can merge reinforcement marks automatically to reduce the number of marks in the drawing.
Example
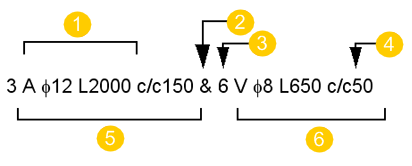
In this example, three A φ12 L2000 marks are merged to a block, and six V φ8 L650 marks to another block, and then these blocks are merged in the following way:

- Single mark content
- Symbol separating the blocks
- Block prefix
- Distance between groups
- Block 1
- Block 2