Working in Trimble Connect Visualizer
2019i
Tekla Structures
Working in Trimble Connect Visualizer
Before you take snapshots or create animations in Trimble Connect Visualizer , you can zoom, drag, and pan the model to get the desired views. You can also adjust the scene settings to control, for example, the brightness of the scene and the position of the sun.
Zoom, rotate, or pan the rendered model
Do any of the following:
| To | Do this |
|---|---|
Zoom in |
Do either of the following:
|
Zoom out |
|
Rotate the model |
You can also press the arrow keys on the keyboard to rotate the model. |
Pan the model |
You can also press the A and D keys on the keyboard to pan the model. |
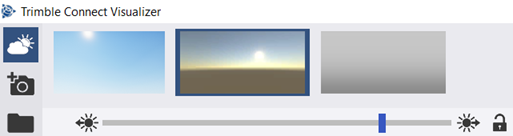
Adjust the scene
In Trimble Connect Visualizer , you can modify the following scene settings:
The used skybox, or background, and its rotation
The position of the sun
The brightness of the scene
The visibility and position of the ground plane
- Click
 on the Trimble Connect Visualizer side pane.
 - Do any of the following:
To Do this Change the skybox
The skybox that is currently in use is highlighted with blue. To change the skybox:
Click another skybox in the skybox selector at the top of Trimble Connect Visualizer.
You can also create your own images as skyboxes. Note that all skybox images need to have a ratio of 2:1. Save the skyboxes in the C:\Users\<user>\Pictures\TrimbleConnectVisualizer\Skyboxes folder. The skyboxes will be available in the skybox selector the next time you open Trimble Connect Visualizer.
Rotate the skybox
Move the rotation slider at the top of Trimble Connect Visualizer.

You can lock the position of the skybox and the direction of the sun together by clicking
 . After locking the direction of the sun and the position of the skybox, moving the rotation slider also moves the sun direction slider by the same amount.
Adjust the brightness of the scene
Move the brightness slider at the upper-right corner.

Adjust the position of the sun
Do any of the following:To change the direction of the sun, move the sun direction slider at the upper-left corner.

You can lock the direction of the sun and the position of the skybox together by clicking
. After locking the direction of the sun and the position of the skybox, moving the rotation slider also moves the sun direction slider by the same amount.To change the height of the sun above the horizon, move the sun height slider on the left side of the rendered model.

Show or hide the ground plane
To switch between showing and hiding the ground plane, click
 on the left side of the rendered model.
When the ground plane is switched on, a slider appears below the
button. You can move the slider to adjust the height of the ground plane.
Take and view snapshots
- Adjust the position of the model and the scene as needed.
- Click
 at the upper-left corner of the Trimble Connect Visualizer window.
Trimble Connect Visualizer takes a snapshot of the current view of the rendered model. The snapshots are saved in the C:\Users\<username>\Pictures\TrimbleConnectVisualizer folder.
To open the C:\Users\<username>\Pictures\TrimbleConnectVisualizer folder and view the snapshots that you have taken, click at the upper-left corner of the Trimble Connect Visualizer window.
Create animations
You can combine different views of the rendered model to create animations that show the model from different angles. Do the following:
- Click
 on the Trimble Connect Visualizer side pane.
 - Do any of the following:
To Do this Add a view
Move the model to get the view that you want to use.
Click + on the toolbar below the view.
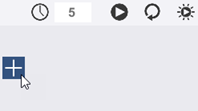
Repeat steps a to b to create all necessary views.
Note that when you have added multiple views, you need to click + on the right side of the view after which you want to add the new view. Similarly, click + or on the left side of the view before which you want to add the new view.
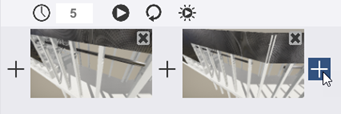
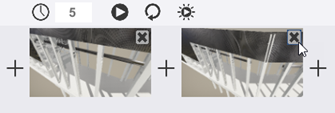
Remove a view from the animation
Click the Close button ( X ) at the upper-right corner of a view.
Set the time between views
The time between views determines the speed of the animation.
Type the desired time in seconds in the box below the rendered model (
 ).
).
Play or stop the animation
To play the animation, click
 on the toolbar below the rendered model.
To stop the animation and return to the first view, click
 .
.
Play the animation continuously
You can choose to play the animation in a loop without stopping.
Click
 on the toolbar below the rendered model.
To play the animation, click
.
Freeze the sun position in the animation
In each view you create, the sun is in a different position. Animations can look strange if the sun moves, so it might be helpful to freeze the sun position.
Click
 on the toolbar below the rendered model.
Return to the initial view of the model
Click on the Trimble Connect Visualizer side pane.
on the Trimble Connect Visualizer side pane. The model returns to the view that was opened when you started Trimble Connect Visualizer.
Enter or exit full screen mode
Click on the Trimble Connect Visualizer side pane.
on the Trimble Connect Visualizer side pane. Show or hide the Trimble Connect Visualizer side pane
Click at the bottom of the Trimble Connect Visualizer side pane.
at the bottom of the Trimble Connect Visualizer side pane.