Visualizer for Tekla Structures
2019
Tekla Structures
Environment
Not environment-specific
Note that Visualizer is included in Tekla Structures installation starting from the version 2019i, and you do not need to install it separately from Tekla Warehouse.
What is it?
Visualizer makes Tekla Structures models look amazing to everyone, technical and non-technical people alike.
Visualizer helps Tekla Structures customers to build compelling sales and project presentations to add to reports and form part of e.g. a PowerPoint presentation. The Visualizer enhances presentations with compelling, descriptive content that demonstrate design and build options and clearly communicate the structural strategy for feedback from the widest stakeholder audience to drive productivity and project quality gains.
Visualizer is a Tekla Structures Extension found in Tekla Warehouse that provides basic rendering of the Tekla Structures 3D model using a Unity 3D game engine. This is not intended to be a fully functional renderer such as Vray by Chaos Group. or TwinMotion.
System requirements
Tekla Structures version: 2019 or later
Environments: All
Getting started
The visualizer can be downloaded and installed from the Tekla Warehouse and runs as a seperate application from Tekla Structures.
Addtional folders are also created during installation:
C:\Users\<username>\Pictures\TrimbleConnectVisualizer . This folder is where you will find snapshots created from visualizer
C:\Users\<username>\Pictures\TrimbleConnectVisualizer\Skyboxes you save your own skyboxes which acts as backgrounds for your renders.
When creating a skybox, you can create to whatever resolution you like but it must be at a ration of 2:1. e.g. You can use a photoediting program to create a picture that is 2000 pixels wide by 1000 pixels high and save that as a .png file to this location.
Once installed, the visualizer will be launched only from within Tekla Structures from icons in the Applications and Components sidepane.
What are the basic commands?
Image

Visualizer was designed to be very simple to use.
Visualize All: Clicking this will send the entire model to be visualized.
Visualize selected: Clicking this will visualize only selected 3d model parts. This functionality will not work on models running old Static ID's. On new models, only the Selected items will be rendered. If you wish to always render the same selected parts, you can create a Category in Organizer.
Visualizer Material type mapping: Clicking this will run material mapping dialogue so you can make the materials in visualizer look how you would like them to look. Note that during startup, the visualizer will attempt to create mapping between Tekla Structures native parts and Unity material maps. This may not always meet your expectations, in which case you may wish to manual decide what materials in Tekla Structures are mapped to which materials in the Unity render engine.
Materials
There is a limited number of materials contained in this version of the visualizer. While you may have many different materials in the Tekla Structures model, you may only map to 10 different materials in visualizer. Those materials are
- <blank> renders the color of the Tekla Structures class as a matt material similar to plastic. This is useful if you need to show class colors to communicate an aspect of the structural design.
- Ashphalt
- Concrete
- Dark Gravel
- Default (renders an 'architectural model' white matt materal
- Glass
- Grass
- Ground
- Light Gravel
- Steel
- Timber
Limitation: You can only render according to Tekla Structures 'material' and not to Tekla Structures 'surface finish'. It is, therefore, not possible currently to render, for example, the color of white paint on grey concrete unless you make the concrete material white.
When you are finished, you can save the mapping file. An xml file will be created that saves your mapping selections. The location of this xml mapping file can be placed in either:
a: Environment folder: The material mapping will apply to this and all other projects you are working on.
b. Model folder: The material mapping only applies to the current model and so can be shared with others in your team (e.g. via Tekla Model Sharing or Multi-User)
Is it possible to have the material.xml mapping file in both the Model Folder and the Environment folder?
Yes. There are three steps.
- Save the mapping file to Model as prompted after editing the mapping in the Visualizer Material type mapping dialogue.
- Then reopen the same dialogue ( Visualizer Material type mapping) and save again. You will be prompted save to Environment.
- Then reopen the same dialogue, and Save. You will be prompted to Save to Model Folder. The file is now saved to Environment AND to Model folder.
Is it possible to change the shade of material e.g make a lighter steel color?
Yes. Change the RBG-A values in the file:
..\TrimBIMVisualizer\Trimble Connect Visualizer_Data\StreamingAssets\materials_ifc.xml
So, if you want steel to be lighter, change the values in:
<Material Type="STEEL" Values="STEEL">
<Color R="255" G="255" B="255" A="255" />
Change this to:
<Color R="255" G="255" B="255" A="255" />
Change this to:
<Material Type="STEEL" Values="STEEL">
<Color R="200" G="200" B="200" A="255" />
Inside the visualizer window
Image
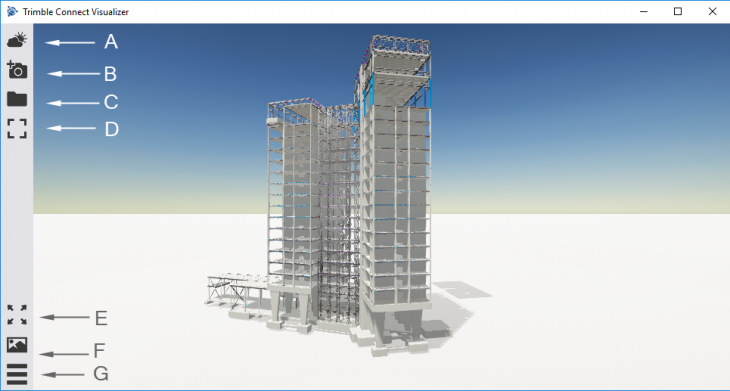
A: Scene settings
B: Take snapshot of view. This is saved to C:\Users\<username>\Pictures\TrimbleConnectVisualizer
C: Open the snapshot folder C:\Users\<username>\Pictures\TrimbleConnectVisualizer
D: View full screen. Press again to return back to previous view size.
E: Home view: zoom to home view
F: Create views and create movie
G: Hide sidepane. Useful when creating a movie.
Scene settings
Image
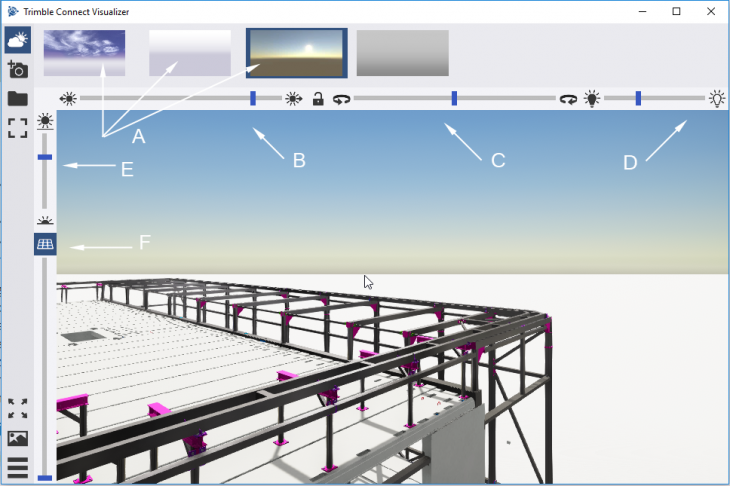
A: Skybox selector. When creating a skybox, you can create to any resolution you like but it must be at a ratio of 2:1. e.g. You can use a photo-editing program to create a picture that is 2000 pixels wide by 1000 pixels high and save that as a .png file to this location.
B: Direction of sun (move for more dramatic views)
C: Rotation of skybox (move the skybox so if looks the best from the direction you are taking a snapshot)
D: Brightness of scene
E: Sun height above the horizon
F: Turn on ground plane. When this is activated, the slider is also activated and you can change the ground plane height - so that e.g the building doesn't appear to be floating entirely in space
Create views and create animation
Image
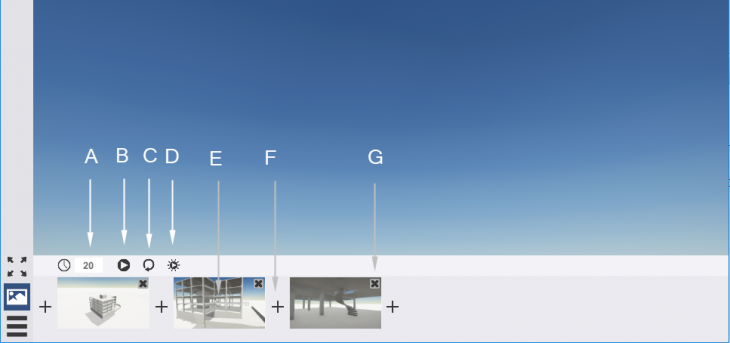
A: Time between saved view. A view acts as a 'keyframe' in a movie.
B: Play movie
C: When playing movie, loop so the movie playes continuously
D: Freeze the sun position as the movie plays between views. Why? Because you can have a different sun position in each view, and it is strange to have a moving sun during a movie.
E: Saved view
F: Add view between two views
G: Delete view
How to save a movie
Use screen recorder: the inbuilt free screen recorder on Windows 10 is under the Game DVR feature inside the Xbox app in Windows.
https://mashtips.com/built-in-windows10-screen-recorder/
Frequently Asked Questions:
1. How can I share the visualizer views I have set up so others who are sharing the Tekla Structures model can ? This is possible but was not the intention of this visualization tool. The viewponts are saved to :\Users\<user|\AppData\Local\TrimbleConnectVisualizer\WayPoints
2. How can I share the materials I created with the Tekla Model Sharing team? When you are prompted to save the material mapping after making changes using the Visualizer Material type mapping application , you can choose to save the materials.xml to the model folder. This will allow that material mapping to be shared with the rest of the team. When they then start the visualizer, the .xml from the model folder will be read first.