Release Info Tekla Structures 2022
2022
Tekla Structures
Environment
Construsoft European
The Release Info Tekla Structures 2022 includes the following topics:
General
Changes in the folder structure
Tekla Structures has made some changes regarding the folder structure.
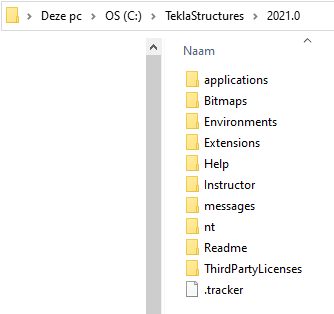
Tekla Structures 2021:
Image
Tekla Structures 2022:
Image
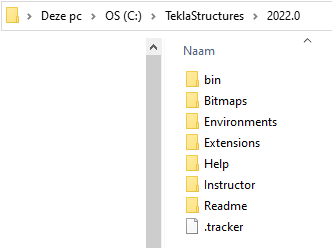
The folder nt has now been removed, this is the bin folder now and as a result of this change, the tool dstv2dxf (for converting NC files to *.dxf files) is moved from the folder
C:\TeklaStructures\<earlier_version>\nt\dstv2dxf
to the folder
C:\TeklaStructures\2022.0\bin\applications\Tekla\Tools\dstv2dxf
NOTE
As a Tekla Structures user, you may have adjusted settings in the file tekla_dstv2dxf_metric_Construsoft.def, for example the colors and layers for plates and holes from the *.dxf file or the height and color of the desired printed text.
Then copy the file tekla_dstv2dxf_metric_Construsoft.def to the folder
C:\TeklaStructures\2022.0\bin\applications\Tekla\Tools\dstv2dxf
in Tekla Structures 2022.
Changes in the autosave interval
The autosave interval for model changes is now based on time, not on the number of commands as previously.
Autosave interval is set in File > Settings > Options, in the General settings.
Image

Previously, the number you entered in the first field was the number of commands you had to run before Tekla Structures saved the model.
Now, the number you enter in the first field is the minutes after which Tekla Structures saves the model. The default is 15 minutes, after which Tekla Structures autosaves your work. The minimum time interval is 2 minutes.
Note that if there are no changes in the model during the autosave interval, the autosave is not triggered.
When you enter the value and then click the button OK, this value is used (in all models) until you enter another value. There is no need to save your changes as a standard setting by using the Save As button.
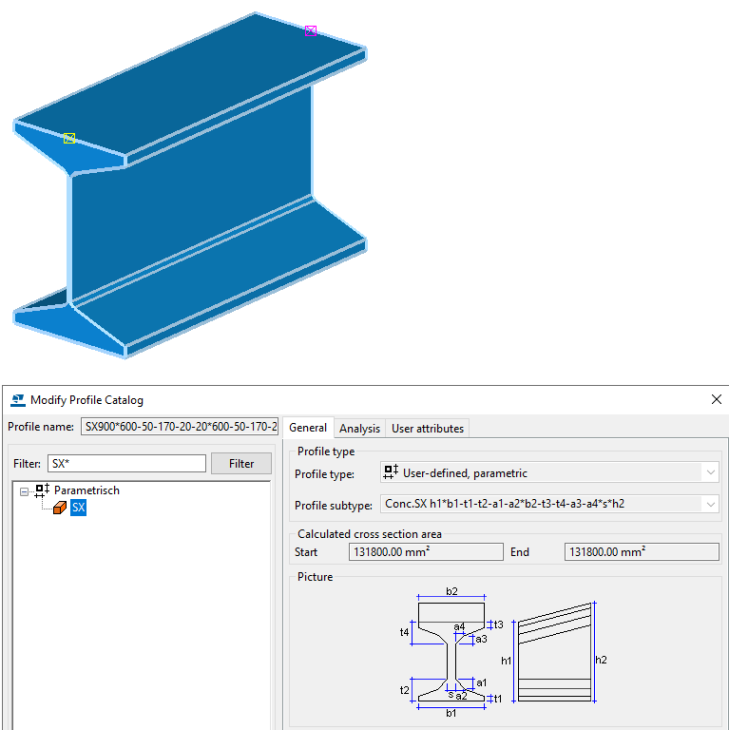
New profiles available
Tekla Structures 2022 includes the following new parametric profiles:


Image
Image
Image
New assembly-weld list available
Tekla Structures 2022 includes the new assembly-weld-list. This list shows the size and length of the welds per assembly:
Image

New custom property available
Tekla Structures offers you various custom properties. These are intelligent and dynamic properties that can be applied in filters, reports and templates.
Click here for detailed information about custom properties.
Tekla Structures 2022 includes the new custom property CUSTOM.CS_NR_OF_PARTS_IN_ASM that allows you to show the total number of parts of an assembly in templates and reports.
Example
Image

Image

In Tekla Structures 2022, the new custom property CUSTOM.CS_NR_OF_PARTS_IN_ASM is not included in the standard templates and reports supplied by Construsoft. You can include the property in the desired templates and reports as needed.
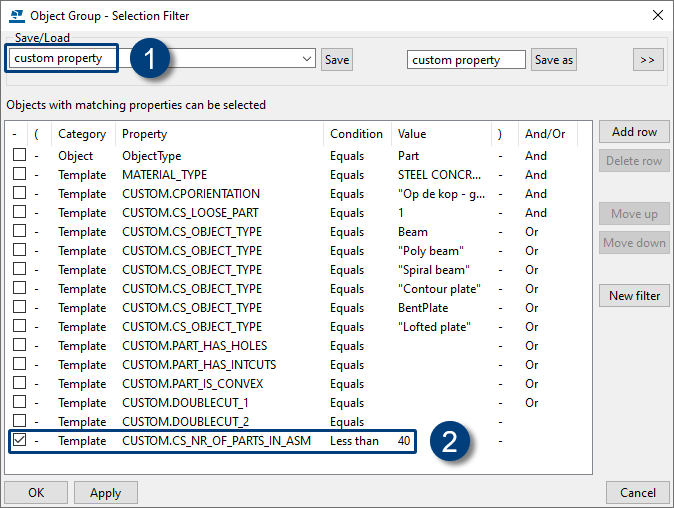
In Tekla Structures 2022, the custom property (1) setting, which is available in the View filter and the Selection filter, has also been extended.
In the setting, the new custom property have been added so that you can, for example, define that you want to select assemblies that contain less than the specified number of parts (2), for example to generate other drawings for these assemblies:
Image
Number of characters increased for value fields and folder paths
The number of characters that can be used in some value fields and folder paths has been increased. This affects value fields in templates in drawings and also in reports lists.
The Name property can now contain up to 61 characters instead of the previously supported 21 characters:
Image

Also in system components more characters can now be used in various value fields:
Image
NOTE: Value fields in templates and reports with ***
In case you have created templates in drawings or reports yourself or modified existing templates and/or reports, then check them and adjust the number of characters as needed (after copying them to your TS folder of Tekla Structures 2022).
A value field in templates and reports could not be displayed completely, as a result of broken value, indicated by three asterisks (***):
Image

For example, if in a template the length of a value field is set to 10 characters in the Template Editor (via File > Editors > Template Editor) and in the output the value is 11 characters or more, *** is added at the end of the displayed value.
Adjust the number of characters, if possible, in templates and reports in the Template Editor to ensure that value fields are fully displayed.
Construsoft has not made any changes to its standard supplied reports and templates with regard to the number of characters: you can of course adjust these according to your needs.
Adjusted attributes in the file objects.inp
General
In Tekla Structures, almost all model objects (profiles, bolts, welds, reference model objects, reinforcing bars, surface treatments), the project properties, and the drawing properties include user-defined attributes.
The project properties also contain user-defined attributes, including the Parameters tab:
Image

User-defined attributes are defined in an inp file. By default, several objects.inp files are available in Tekla Structures.
In Tekla Structures 2022, in the file objects.inp in the folder
C:\TeklaStructures\2022.0\Environments\ConstrusoftEuropean\General\Inp
the user-defined attributes IFC BUILDING and IFC BUILDING_STOREY are set to attribute. In earlier Tekla Structures versions, these were set to unique_attribute.
attribute: attribute that is copied to the properties of other parts.
unique_attribute is an attribute that cannot be copied, so the value of this attribute is never copied to another part.
|
Image
|
If you have defined custom additions in a separate objects.inp file (and may have saved it in a model folder or in the TS folder), check this file and adjust the attributes if necessary so that they are updated in Tekla Structures 2022. |
Click here for detailed information about user-defined attributes.
Localization: Update personal settings/files
General about localization
When you switch to Tekla Structures 2022 as a Tekla Structures user, you can use the settings and files that you modified in a previous Tekla Structures version. Tekla Structures will not copy them automatically, you have to do it yourself.
There are some settings/files that we will highlight because these are possible customizations that you may have made in an earlier Tekla Structures version and cannot be copied to Tekla Structures without any further action.
Compare them to your situation and, if necessary, take the steps that apply to you. This allows you to start working in Tekla Structures 2022 quickly and easily.
It is recommended that you document your own changes by documenting them and using this Word document as a basis, possibly supplemented with your personal points of attention. In that way you always know what your adjustments are.
Update model templates
In case you have created model templates in earlier Tekla Structures versions, you must update the model templates to use them hassle-free in Tekla Structures 2022.
Click here for a general step plan.
The customized ribbon and shortcuts
You can copy your customized ribbon and shortcuts, after installing Tekla Structures 2022, from an older Tekla Structures version to Tekla Structures 2022.
Copy the ribbon
You can copy your customized ribbon from an older Tekla Structures version to Tekla Structures 2022.
NOTE: If you copy your customized ribbon, new available (in Tekla Structures 2021) command buttons will be missing, for example the new command Create fabrication drawings in the Model Editor for creating part, assembly and cast unit drawings more efficient and simpler:
Image

You can also first compare the "old" ribbon with the new "standard" ribbon in Tekla Structures 2022 via File > Settings > Ribbon > Compare in both Model and Drawing Editor.
You will see the differences between your customized ribbon and the "default" Tekla Structures 2022 ribbon, for example the new command Create fabrication drawings.
You can now choose to add the missing command buttons or to use the new default ribbon.
You can do next to copy your customized ribbon:
1. In the Windows Explorer, go to the folder (depends on the Tekla Structures-version)
C:\Users\<user>\AppData\Local\Trimble\TeklaStructures\<older version>\UI\Ribbons\
or the folder
C:\Users\<user>\AppData\Local\Trimble\Tekla Structures\<older version>\UI\Ribbons\
2. The *.xml file albl_up_<license>--main_menu.xml contains the customized ribbon.
3. Copy this *.xml file to the folder C:\Users\.<user>\AppData\Local\Trimble\Tekla Structures\2022.0\UI\Ribbons
Note that the ribbon file name is determined by the Tekla Structures configuration you are using. For example, for the Steel Detailing configuration, the file name albl_up_Steel_Detailing - main_menu.xml is used. Because there are three new configurations available in Tekla Structures 2021, the following table shows the available configurations and their file names:
Image

* New in Tekla Structures 2021. These options are only available if you have a subscription.
Click here for more detailed information about copying the ribbon.
Click here for more information about comparing the changes between a customized ribbon and the original ribbon.
Copy shortcuts
To copy shortcuts from an earlier Tekla Structures version to Tekla Structures 2022:
1. In an earlier Tekla Structures version, go to File > Settings > Keyboard shortcuts.
2. Click on the button Export, save the *.xml file on the desired location with the desired name.
3. In Tekla Structures 2022, go to File > Settings > Keyboard shortcuts.
4. Click on the button Import, select the *.xml file and click on the button Open, the shortcuts are now imported.
You can copy the exported *.xml file to any computer and next import the file in Tekla Structures 2022.
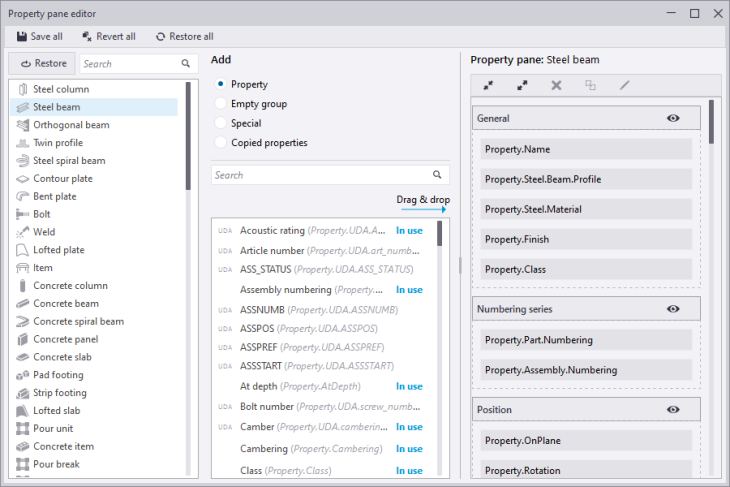
The customized property pane layout
In Tekla Structures many objects such as columns and beams include their own property pane layout:
Image

If desired, you can customize the content of these property panes in the Property pane editor (via File > Settings > Property pane):
Image
Click here for detailed information about customizing property panes.
Tekla Structures 2022 includes a number of improvements regarding to the IFC export to better comply with agreements regarding the exchange of information: for example, you now have more control over the object types for a better workflow when transferring information to the IFC4 format and you can define the necessary IFC entities more precisely with the new predefined and user-defined subtypes.
Click here for more information about the improved IFC4 export.
With these improvements the IFC entity setting was earlier located in the user-defined attributes dialog box for model objects (on both part and assembly level), and it is located in the IFC export section in the property pane for model objects, and accessed more easily:
Image

NOTE
In case you have customized the content of the property panes in earlier Tekla Structures versions, and you copy these settings to Tekla Structures 2022, the IFC related fields mentioned above are missing.
To have these fields in Tekla Structures 2022, you must do the following:
1. Copy the file PropertyTemplates.xml (in which the customizations are stored) from the folder:
C:\Users\<username>\AppData\Local\Trimble\Tekla Structures\<earlier_version>\UI\PropertyTemplates
to the folder:
C:\Users\<username>\AppData\Local\Trimble\Tekla Structures\<2022.0>\UI\PropertyTemplates
2. Now manually add the IFC related fields in the Property pane editor.
To distribute the customized property panes within your company, store the file PropertyTemplates.xml in the same folder on the concerned computers.
Part settings
In Tekla Structures you have the possibility to create and save settings for all parts (columns, beams, contour plates, concrete walls, reinforcement, etc.) in the property panes:
Image

When you want to copy these self-saved settings to Tekla Structures 2022, mind the following:
In Tekla Structures 2022, a number of improvements have been made to the IFC export to better comply with information exchange agreements: for example, you now have more control over the object types for a better workflow when transferring information to the IFC4 format and you can define the necessary IFC entities more precisely with the new predefined and user-defined subtypes.
Click here to learn more about the enhanced IFC4 export.
As a result of these improvements in the IFC export the name of the attribute IFC-entity has changed:
Image

To make sure that your self-saved settings are suitable for correct export to IFC4 in Tekla Structures 2022, do the following:
1. Copy the self-saved settings to Tekla Structures 2022, for example to the TS folder.
2. Open Tekla Structures 2022 and select the appropriate setting from the drop-down list.
3. Set the correct value fields for the IFC export (1) and save the settings again (2):
Image

4. Copy the setting(s) to your TS folder.
Component settings
In Tekla Structures you have the possibility to create and save settings for all components in the properties dialog boxes:
Image

When you want to copy these self-saved settings to Tekla Structures 2022, mind the following:
In Tekla Structures 2022, a number of improvements have been made to the IFC export to better comply with information exchange agreements: for example, you now have more control over the object types for a better workflow when transferring information to the IFC4 format and you can define the necessary IFC entities more precisely with the new predefined and user-defined subtypes.
Click here to learn more about the enhanced IFC4 export.
As a result of these improvements in the IFC export the name of the attribute IFC-entity has changed:
Image

To make sure that your self-saved settings are suitable for correct export to IFC4 in Tekla Structures 2022, do the following:
1. Copy the self-saved settings to Tekla Structures 2022, for example to the TS folder.
2. Open Tekla Structures 2022 and select the appropriate setting from the drop-down list.
3. Set the correct value fields for the IFC export (1) and save the settings again (2):
Image

4. Copy the setting(s) to your TS folder.
NOTE
See also chapter System components for saving settings of various system components which have been taken over by Tekla.
Customized Applications and components catalog
In Tekla Structures you have the possibility to customize the Applications and components catalog, such as creating your own groups, adding subgroups or customizing the order of groups.
Image

Click here for detailed information about customizing the Applications and components catalog.
In case you have made customizations in the Applications and components catalog in earlier Tekla Structures versions, you can copy this catalog to Tekla Structures 2022.
Customizations are saved in the file ComponentCatalog.xml (for example, in the TS folder).
If you want to copy the customized Applications and components catalog to Tekla Structures 2022, note the following:
In Tekla Structures 2022, several tools/plug-ins have been taken over by Tekla and have therefore been renamed, for example, plug-in Part to part fitting (j003) for fitting and/or trimming parts that is now called Fit beams and columns. (See chapter Tools/plugins for more information about tools/plugins taken over by Tekla).
When you have added such tools/plug-ins to personal groups or subgroups in the Applications & components catalog, they are no longer available due to these customizations in Tekla Structures 2022:
Earlier Tekla Structures versions:
Image

Tekla Structures 2022:
Image

So in this example you will have to add plug-in Fit beams and columns to the Favorites group yourself so that you again have an updated Applications and components catalog.
In case you see an icon with a red cross in the lower right corner of the image above, click on it to display the notification log file of the Applications and components catalog.
Click here for more detailed information about the maintenance of the Applications and components database.
Administrator's release notes
This Release Info from Construsoft highlights various settings and files to ensure that you can quickly start working in Tekla Structures 2022.
In addition to this Release Info, also the Administrator's release notes are also available. In these release notes you will find more information about changes that may be interesting for you.
Please check this information as a Tekla Structures user or let your system administrator take a look at it to see what else deserves attention.
Interoperability
Attribute changed for using IFC Extender (ML126)
In Tekla Structures you have the option to export a Tekla Structures model (or part of it) to an IFC file.
For this export, default property set are available in which you can define which attributes you want to include in the export to IFC. Click here for more detailed information about defining property sets for export to IFC.
However, in the export to IFC, some attributes are filled in in a certain way, but you possibly may want to have another value for some attributes for the purpose of some agreements that have been made regarding to exchanging information, or fields that cannot be filled in by default in Tekla Structures.
For this, the tool IFC Extender (ML126) is available in the Applications & components database.
In Tekla Structures 2022 (and also in Tekla Structures 2021 SP7) attribute IFC_USER_ASS has been changed for this. Previously, when using this attribute, an incorrect option was exported to IFC on an IFC export via the tool IFC Extender (ML126). The order of the options in this attribute has now been changed so that the IFC Extender (ML126) now applies the correct option in the IFC export.
Click here for detailed information about the tool IFC Extender (ML126), chapter Interoperability > New tool IFC Extender (ML126).
Modeling
Plug-in Codes to profiles (ML052): Cross-section code now included in the numbering
In Tekla Structures you have the possibility to use plug-in Codes to profiles (ML052). The plug-in is available in Tekla Warehouse.
Image

You use the plug-in Codes to profiles (ML052) to recognize/classify profiled profiles and to write the cross-section dimensions and the code of the profile to the user-defined attribute of the part:
Image
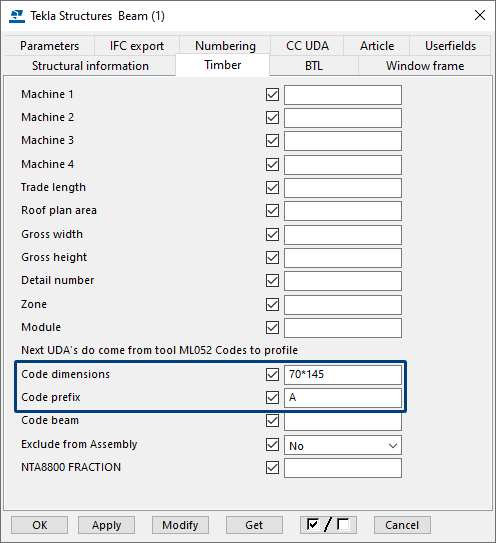
In Tekla Structures 2022, the value written for the cross-section code is now included in the numbering.
The reason for this is that plug-in Codes to profiles (ML052) is able to differentiate an 'image' and a 'mirror image' of plates, Tekla itself is not doing this. By now including this user-defined attribute in the numbering, plates with the same volume and model will still receive a different number because the profile code of the plates is different. This makes it easier to process these kinds of plates on reports, but also in the machine export, and for you as an end user it is clear that, despite the fact that the plates are apparently the same, we are dealing here with different plates.
The disadvantage of this setting is that we have to number twice, before applying plug-in Codes to profiles (ML052) and again afterwards.
Plug-in Codes to profiles (ML052) can also be used in the tool Reporting (ML112) for generating advanced saw reports:
Image
Image

NOTE:
When opening a model in Tekla Structures 2022 that has been created in an earlier Tekla Structures version, go to the File menu and click Diagnose &repair, next in the Utilities area, click Diagnose and change attribute definitions.
You also do this if you have personal model templates that you want to copy to Tekla Structures 2022.
If the definitions of a user-defined attribute have changed (in the file objects.inp), you need to update the definitions in the model. That is now the case.
Click here for detailed information about updating user-defined attribute definitions.
Part hidden lines behind concrete parts visible
In earlier Tekla Structures versions, part hidden lines behind concrete parts were not visible when displaying parts was set to Parts wireframe (Ctrl+1).
The option Use legacy rendering (via File > Settings) is disabled and the option Dashed line for hidden line is enabled.
In addition, the advanced option ENABLE_POUR_MANAGEMENT is set to TRUE.
Earlier Tekla Structures versions:
Image

Tekla Structures 2022:
Image

Rebar assemblies (cages)
Tekla Structures 2022 introduces rebar assembly, a reinforcement object type that combines together any reinforcement object types. You can also include assemblies in rebar assemblies, and so add couplers, end anchors, and other parts as sub-assemblies. Rebar assemblies are useful when you model reinforcement cages or custom meshes that will be prefabricated, for example.
Click here for detailed information about rebar assemblies in the Tekla Release Notes.
As a result of this new option, a number of customizations have been made. To clarify this, let's use a wall that includes a number of cages as rebar assemblies and some rebars on the edges of the wall:
Image

Layout and templates
In the drawing of the cages (modeled as rebar assemblies):
Image

you now have the layout cage_A4 (297x210) in the Cast Unit Drawing Property cage:
Image

in which the new template bending-schedule-rebar-shape-cage.tpl is included:
Image

showing all detailed information about the cages.
In addition, in the concrete drawing of the wall, the template bending-schedule-rebar-shape.tpl is adjusted.
Image

so that the cages are listed separately:
Image

A row has been added for this in the relevant template.
Image

the content type is REBAR_ASSEMBLY:
Image

NOTE
In case you have modified the template bending-schedule-rebar-shape.tpl in earlier Tekla Structures versions, consider whether you want to continue using your customized template and perhaps customize it or whether you will use Construsoft's adjusted template and perhaps make your previous modifications in this template.
Reports
Besides the reports PDF-bending-schedule_shapes.pdf and castunit_rebarlist have been modified so that the cages are now listed separately:
Image

Image

NOTE
In case you have modified the mentioned reports above in earlier Tekla Structures versions, consider whether you want to continue using your customized reports and perhaps customize these or whether you will use Construsoft's adjusted reports and perhaps make your previous modifications in these reports.
Also, the new report PDF-rebar_cageslist.pdf is now available, which shows the cages specifically:
Image

System components
Wooden purlin (1)
In earlier Tekla Structures versions, system component Wooden purlin (1) was included:
Image

Image

System component Wooden purlin (1) has been taken over by Tekla and its name is now Wooden purlin shoe (15):
Image

Image
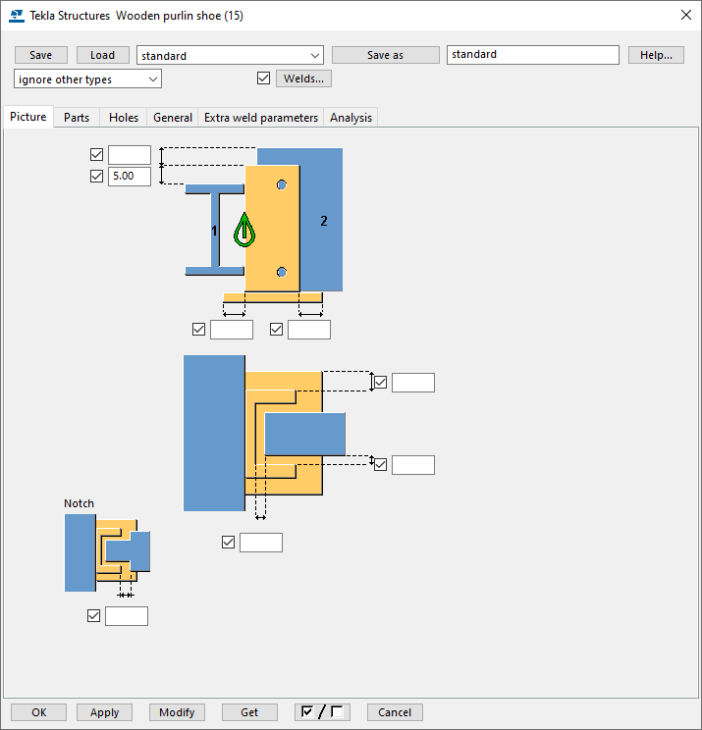
Note the following with Tekla's takeover of this system component:
When you have made settings in earlier Tekla Structures versions for system component Wooden purlin (1), these settings were saved as follows:
<name_setting>.j90000001
So the file extension was *.j90000001
From Tekla Structures 2022 on the settings are stored with the new file extension *.j80000015.
|
Image
|
This means that you need to rename the file extensions of the settings you made in earlier Tekla Structures versions to the new file extension (after copying them to your Tekla Structures 2022 TS folder) so that they are up to date again in Tekla Structures 2022. In Tekla Structures, check if the settings with the renamed file extensions match your "old" settings. |
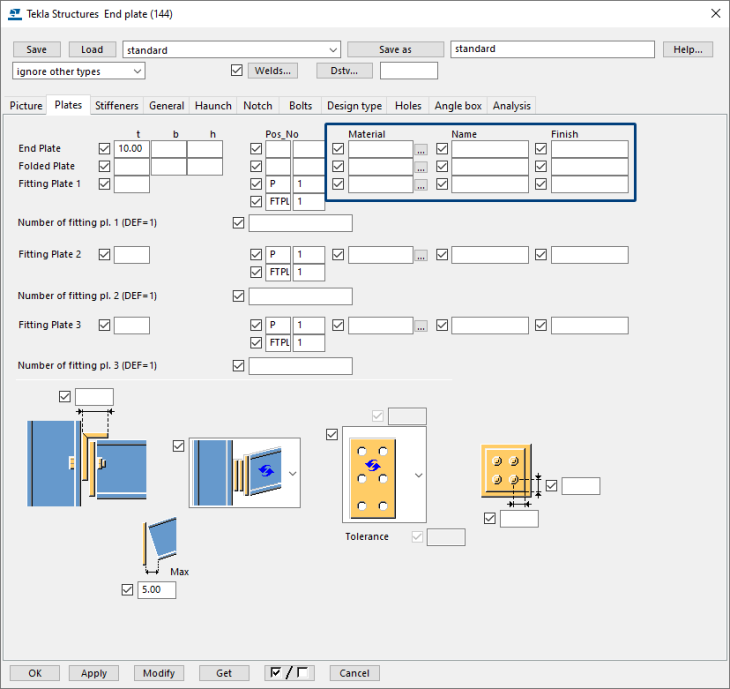
Boltconnection (2)
In earlier Tekla Structures versions, system component Boltconnection (2) was included:
Image

Image

System component Boltconnection (2) has been taken over by Tekla and its name is now Simple bolt connection (5):
Image

Image
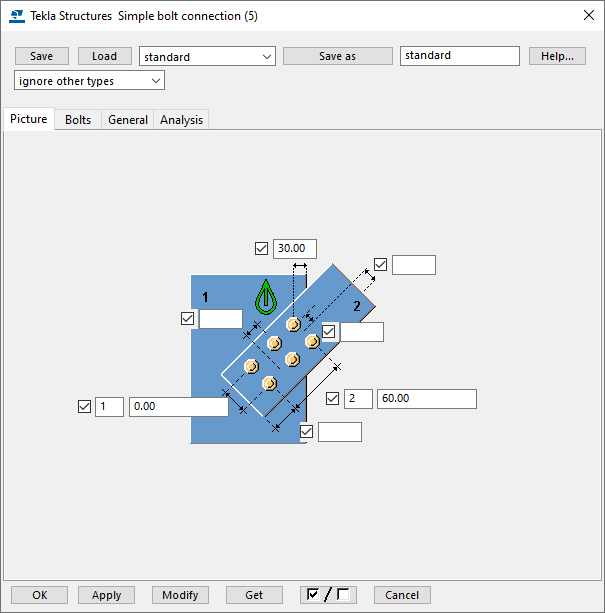
Note the following with Tekla's takeover of this system component:
When you have made settings in earlier Tekla Structures versions for system component Boltconnection (2), these settings were saved as follows:
<name_setting>.j90000002
So the file extension was *.j90000002
From Tekla Structures 2022 on the settings are stored with the new file extension *.j80000005.
|
Image
|
This means that you need to rename the file extensions of the settings you made in earlier Tekla Structures versions to the new file extension (after copying them to your Tekla Structures 2022 TS folder) so that they are up to date again in Tekla Structures 2022. In Tekla Structures, check if the settings with the renamed file extensions match your "old" settings. |
Windbrace (kalotte) (8)
In earlier Tekla Structures versions, system component Windbrace (kalotte) (8) was included:
Image

Image

System component Windbrace kalotte (8) has been taken over by Tekla and its name is now Windbracing 2 (16):
Image

Image

Note the following with Tekla's takeover of this system component:
When you have made settings in earlier Tekla Structures versions for system component Windbrace kalotte (8), these settings were saved as follows:
<name_setting>.j90000008
So the file extension was *.j90000008
From Tekla Structures 2022 on the settings are stored with the new file extension *.j80000016.
|
Image
|
This means that you need to rename the file extensions of the settings you made in earlier Tekla Structures versions to the new file extension (after copying them to your Tekla Structures 2022 TS folder) so that they are up to date again in Tekla Structures 2022. In Tekla Structures, check if the settings with the renamed file extensions match your "old" settings.
|
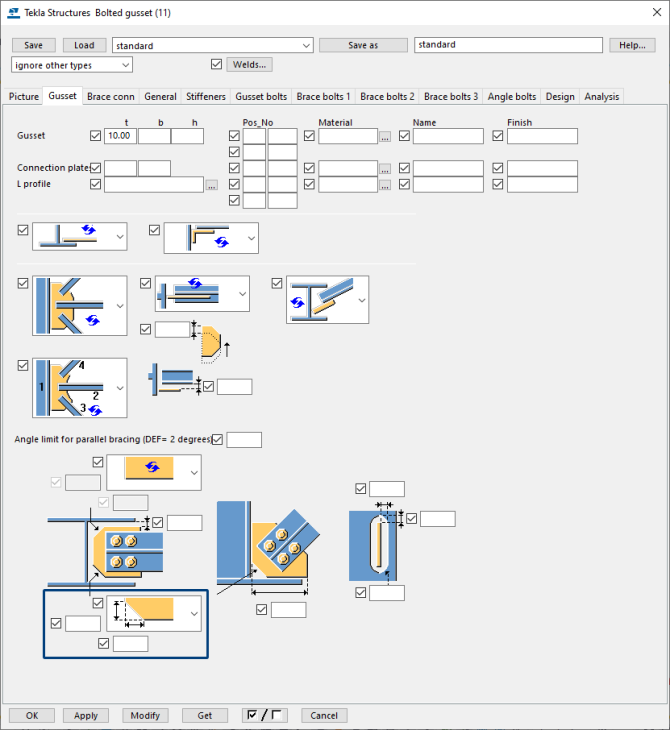
Bolted gusset (11)
Previously, in system component Bolted gusset (11), on the tab Gusset, the field for entering the values for the chamfers for the gusset plate was sometimes unintentionally grayed out. This has been fixed in Tekla Structures (and also in Tekla Structures 2021 SP7):
Image
Concrete var beam (81)
In earlier Tekla Structures versions, system component Concrete var beam (81) was included:
Image

Image

System component Concrete var beam (81) has been taken over by Tekla and its name is now Tapered I-beam (81):
Image

Image
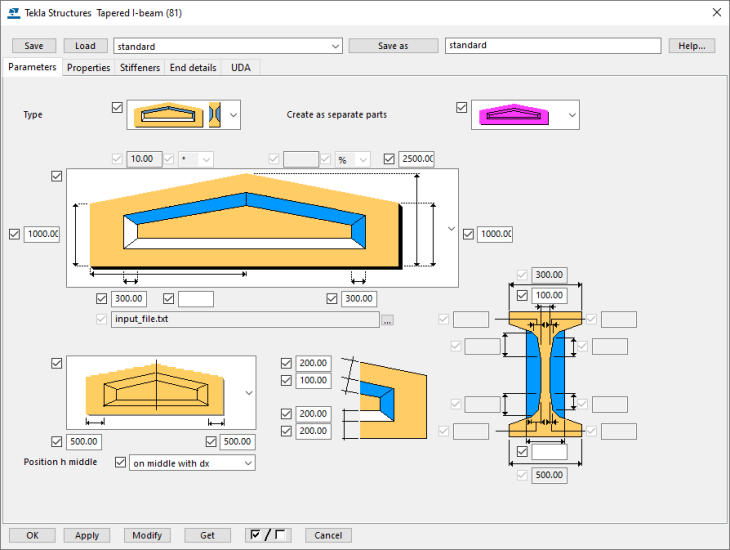
Note the following with Tekla's takeover of this system component:
When you have made settings in earlier Tekla Structures versions for system component Concrete var beam (81), these settings were saved as follows:
<name_setting>.m90000081
So the file extension was *.m90000081
From Tekla Structures 2022 on the settings are stored with the new file extension *.m150000081.
|
Image
|
This means that you need to rename the file extensions of the settings you made in earlier Tekla Structures versions to the new file extension (after copying them to your Tekla Structures 2022 TS folder) so that they are up to date again in Tekla Structures 2022. In Tekla Structures, check if the settings with the renamed file extensions match your "old" settings.
|
Custom components
Custom component "Aftekenen" replaced
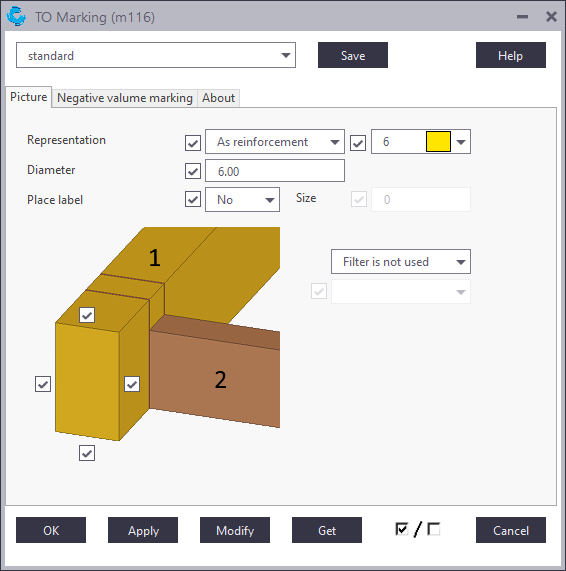
In earlier Tekla Structures versions, custom component Aftekenen.uel was included (in the folder (..:\TeklaStructures\<version>\Environments\netherlands\Timber\ComponentsSketches\uel) for marking the position of secondary profiles:
Image

In Tekla Structures 2022, custom component Aftekenen.uel is no longer available because it has been replaced by plug-in TO Marking (m116) in Tekla Warehouse:
Image

Image
Custom components "Pengat" and "Pengat met spie" replaced
In earlier Tekla Structures versions, custom components Pengat.uel and Pengat met spie.uel were included (in the folder (..:\TeklaStructures\<version>\Environments\netherlands\Timber\ComponentsSketches\uel) for modelling tenon and mortise connections between two beams:
Image
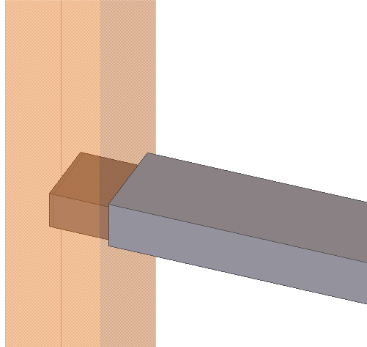
Image
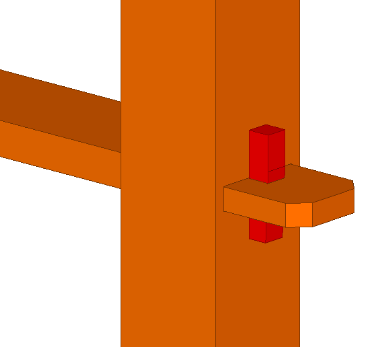
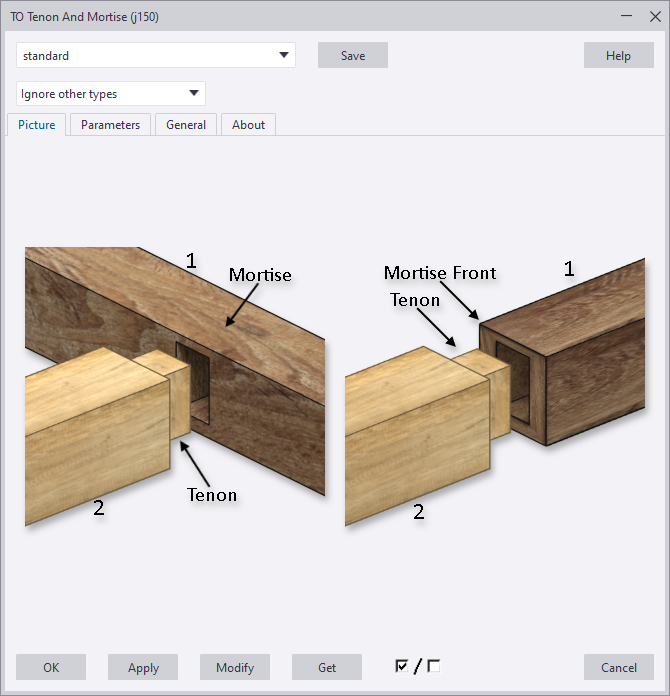
In Tekla Structures 2022, custom components Pengat.uel and Pengat met spie.uel are no longer available because they have been replaced by plug-in Tenon and Mortise (j150) in Tekla Warehouse:
Image

Image
Custom component "Tand" replaced
In earlier Tekla Structures versions, custom component Tand.uel was included (in the folder (..:\TeklaStructures\<version>\Environments\netherlands\Timber\ComponentsSketches\uel) for creating a swallow tale connection between 2 beams , whether they do have an angle or not:
Image

In Tekla Structures 2022, custom component Tand.uel is no longer available because it has been replaced by plug-in Swallow Tenon & Mortise (j158) in Tekla Warehouse:
Image

Image

Drawings
Add rich text
You can add text files in drawings in Tekla Structures with the command Annotations > Rich text:
Image

When you click the command, the Text File Properties dialog box appears:
Image

In Tekla Structures 2022, the setting standard is adjusted, and the setting now includes a link to the sample text file standard.rtf.
Image

The text file standard.rtf is stored in the folder:
C:\TeklaStructures\2022.0\Environments\ConstrusoftEuropean\General\DrawingSettings
A file with the file extension *.rtf is a Rich Text Format file. Such files can include additional information such as font, layout, images, etc.
Create fabrication drawings
Fabrication drawings is a new, more efficient and straightforward method for creating single-part, assembly and cast unit drawings. It is a combination of the existing tools for creating single-part, assembly and cast unit drawings and the new functionality that reduces the amount of repetitive work in the drawing creation process.
Similarly to the current functionality, you can create drawings by using saved settings predefined for different model objects, or by using existing drawings in your model as templates. What is new in the fabrication drawings functionality is that it provides better management capabilities over the creation process, allowing you to select settings for every individual model object or, alternatively, select the best matching drawing template automatically detected in the current model.
Click here for an instruction (English) video.
Click here for detailed information in Tekla's Release Notes.
Tools/plug-ins
Part to part fitting (j003)
In earlier Tekla Structures versions, plug-in Fit part to part fitting (j003) was included in the Model Editor for fitting and/or trimming connected parts (concrete beams or walls, steel plates or beams):
Image

The fittings can be positioned in various ways, including mitre. A joint can be created between the two parts and the two parts can also be joined together (concrete assembly, sub-assembly, welding).
The plug-in has been taken over by Tekla and its name is now Fit beams and columns:
Image

In the Applications and components database, several tags have also been added so that you can easily find it:
Image

Note the following with Tekla's takeover of this plug-in:
When you have made settings in earlier Tekla Structures versions for plug-in Fit part to part fitting (j003), these settings were saved as follows::
<name_setting>.CS_Part_to_part_fitting_Net_j003.xml
So the file extension was *.CS_Part_to_part_fitting_Net_j003.xml
From Tekla Structures 2022 on the settings are stored with the new file extension *.FitBeamsAndColumns.MainWindow.xml.
|
Image
|
This means that you need to rename the file extensions of the settings you made in earlier Tekla Structures versions to the new file extension (after copying them to your Tekla Structures 2022 TS folder) so that they are up to date again in Tekla Structures 2022. In Tekla Structures, check if the settings with the renamed file extensions match your "old" settings. Next load your settings and save them by using the button Save in system component Fit beams and columns. |
Simple plate (m131)
In earlier Tekla Structures versions, the tool Simple plate (m131) was available in the Model Editor to quick and easily model any contour plate:
Image

Click here for detailed information about the usage of the tool.
The tool has been taken over by Tekla and is now available in Tekla Warehouse.
Add rebar symbols (m138)
Tekla Structures 2022 includes the new tool Add rebar symbols (m138) in the Drawing Editor:
Image

Image

Tekla Structures already included the tool CS Draw Rebar Symbols (DR002) in the Drawing Editor:
Image

The tool CS Draw Rebar Symbols (DR002) adds symbols to rebars which indicate the layer of the rebar(group), adds dimension lines to rebars and/or places associative notes at multiple positions of a rebar. (In example position number of bars at start and end of a bar).
However, when you changed the location of the reinforcing bar, the symbol did not go along the bar because there is no associativity, the dimension did go with the bar:
Image

Tekla Structures 2022 now also includes the new tool Add rebar symbols (m138).
This tool only adds symbols on reinforcing bars and no dimension lines. However, the symbols are associative so when the location of a reinforcing bar changes, the symbol automatically moves with it:
Image
Therefore, as a Tekla Structures user, it might be useful for you to:
• use the tool CS Draw Rebar Symbols (DR002) to create dimension lines on reinforcing bars.
• use the tool Add rebar symbols (m138) to add the symbols on reinforcing bars.
Sticker Tool (m141)
Tekla Structures includes the new tool Sticker Tool (m141) in the Model Editor:
Image
Image

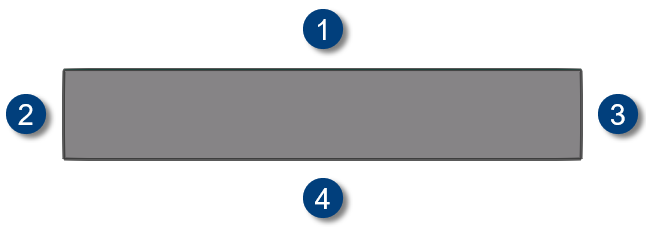
A sticker is often used to indicate the direction of concrete elements, especially when the reinforcement in an element is asymmetrical, so that the workers know how to position the elements on site.
The tool investigates the geometry of the pour side of an element and places a sticker in the shape of a part or a surface at the closest available angle that you can specify (top, left, bottom, right) with a given offset.
Image
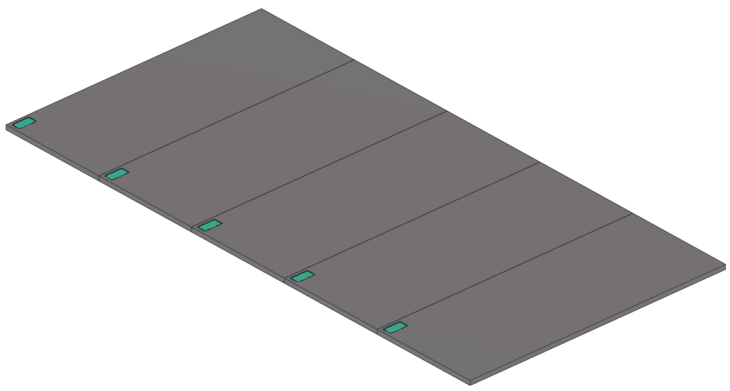
The new tool is a "Detail Component" so that it can be used in the tool Floor Layout so that you as a user can position them automatically.
Image

Treatment symbols (m143)
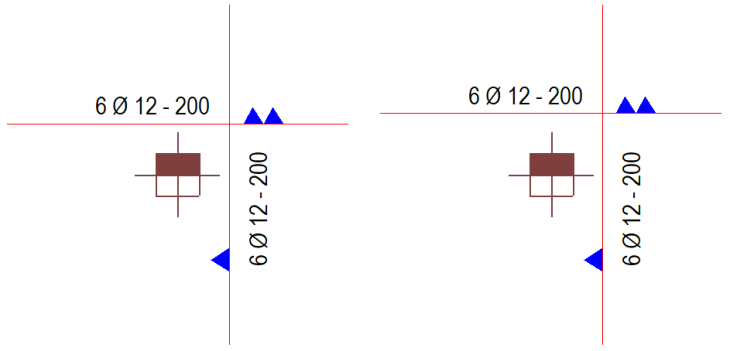
Tekla Structures 2022 includes the new tool Treatment symbols (m143) in the Drawing Editor to create different symbols for different surface treatments.
In prefab concrete, many different finishes/treatments can be applied for the different sides. To indicate this, they can now be provided with a symbol on the sides. This symbol is positioned in the center of the surface treatment and rotates with the side.
Image

Image

In the Model Editor you can position a surface treatment on one or more faces of a part using the command Surface treatment to part face:
Image

Image

You give this surface area(s) a name, for example the name of the finishing type of that part face:
Image
|
Image
|
Image
 |
|
Image
|
Image
 |
|
Image
|
Image
|
|
Image
|
Image
 |
With the tool Treatment symbols (m143) you can then place finishing symbols in the drawings on these surface treatments in the selected drawing views. The tool does this on the basis of conditions, whereby a certain type of symbol can be linked to the name of the type of finish (surface).
Image

Image

Pack & Go (m161)
Tekla Structures 2022 includes the new tool Pack & Go (m161) in de Model Editor:
Image

Image

You use the tool to save the model data and the other necessary files and information in one zip file.
Click here for detailed information about the usage of the tool.
Write value to part UDA (DR164)
Tekla Structures 2022 includes the new tool Write value to part UDA (DR164) in the Drawing Editor:
Image

Image

You use the tool to write values to part UDA's (user-defined attributes) from drawings.
Click here for detailed information about the usage of the tool.
Indicate edges (m167)
Tekla Structures 2022 includes the new tool Indicate edges (m167) in de Model Editor:
Image

Image

You use the tool to gain insight into the types of edges there are, for example from hollow-core slabs and wide slabs. The edges are marked with a Surface Treatment with a specific name. Based on this, for example, a cost calculation can be made of which types and quantity of formwork should be used. Like the Sticker Tool (m141), this tool can also be included in the settings of the tool Floor Layout.
Image

|
Image
|
Image
 |
|
Image
|
Image
 |