I have analysis Warnings and/ or Errors about buckling. Why is this happening and what do I do about it?
Not version-specific
Tekla Structural Designer
Environment
Not environment-specific
Background
Buckling is a regular, everyday phenomenon with which everyone - including non-engineers - will be familiar, as illustrated in the picture below of a buckled plastic ruler. Depending on the analysis type being used, buckling can also occur in computer analysis, just as in reality, if members are insufficiently stiff to resist the compressive forces applied to them.
Image

In the context of TSD analysis, buckling warnings or errors can only occur when running 2nd Order analysis (both linear and non-linear). This is because the form of rigorous 2nd Order analysis implemented in TSD inherently includes elastic buckling behaviour. Indeed, elastic buckling - or the potential for it - is intrinsic to the analysis, since it involves solution of the Geometric (stress) stiffness matrix, which includes the element axial stresses (termed ‘membrane forces’). Compressive axial stress causes the analytical ‘softening’ of elements (termed “stress stiffness”) which in turn produces the 2nd order effects (principally the magnification of member forces) that this form of analysis is intended to give. For more about 2nd Order Analysis see the related article What are the "2nd Order" Analysis options on the Analyze Ribbon in TSD?.
Note that the form of buckling under discussion here for 1D elements (i.e. beams, columns etc) is compression - or ‘strut’- buckling NOT lateral torsional buckling (LTB) due to bending. LTB behaviour is not described in the 1D element stiffness matrix, so does not occur for them (individually) in analysis. So buckling of 1D elements only results from axial compressive loading, not bending. Buckling of 2D element meshes (used in meshed concrete walls for example) can also occur and could be of any form depending on the structural form and loading.
As Euler buckling theory tells us, when the elastic critical buckling load is reached, the member (or indeed an entire structure) will fail in a buckling ‘mode’ or shape which is unbounded - i.e. the element (or structure) can displace indefinitely and hence has zero stiffness. The consequence of this in terms of a numerical computer solution, is that the stiffness terms of buckled element(s) become zero which in turn can render part or all of a structure unstable. The severity of the impact on analysis depends on many factors and can range from warnings to complete failure of solution. In the latter case, there is no choice but to resolve the buckling issues in order to achieve solution. For buckling warnings, our general advice is that they are never ignored, as the solution may be unreliable.
Forms and Properties of Buckling
There are essentially two forms of buckling (which may occur in TSD Analysis):
- Strut buckling - an individual member buckling on its own.
- Sway buckling - an arrangement of members, or even an entire structure, buckling laterally en masse.
Next, there are two quantitative properties which describe the buckling behaviour, these being the mode Shape and mode Factor.
Buckling Mode Shape
From elastic theory; for a single member laterally fixed and pinned at both ends (as in the picture of a ruler above), the first and lowest mode shape is a half sine wave. Some key points are:
- The shape can have any magnitude - as mentioned above, from elastic theory it is unbounded. So the mode shape deflections are not ‘real’.
- There will not be just one mode - again theoretically, a single member has an infinite number of ‘higher’ modes, each formed of larger multiples of sine waves, and occurring at progressively higher compression.
- Practically, in the computerized numerical solution, the number of modes is limited by the number of 1D analysis elements that structural members are comprised of - this is termed the level of discretization of the analysis model.
- Both the mode shape and factor (both inherent in 2nd order analysis and that given by Buckling analysis) will be approximate, not exact.
- The level of approximation is determined by the number of 1D analysis elements used for a member. At least two 1D elements (i.e. one internal node) are required for reasonable accuracy of the first, simplest and lowest mode. The same is true of 2nd order analysis and reasonable accuracy for 2nd order effects, which is the reason why the TSD solver model uses two 1D elements per structural member.
- From the foregoing you will appreciate that a structure comprising many members can have a huge number of modes.
- However, we are generally only concerned about the lowest and simplest modes, since these occur at the lowest load.
Buckling Mode Factor
This is the value of load at which a particular buckling mode occurs, reported as a proportion of any given applied load. When the factor is < 1.0, this means that buckling occurs before that full load can be applied. So, if you tried to run 2nd Order analysis for this load, buckling will occur during the analysis and it could fail to solve.
So, what can you do about this? Read on...
Symptoms and Troubleshooting
When buckling issues occur during analysis, there will be warnings and/ or errors issued in the Solver Status tree, as shown in the pictures below. Our advice is: never ignore these! They will state “Structure may be close to or beyond buckling limit” or “One or more structural elements buckling” together with a tooltip “Run 2nd Order Buckling Analysis” (more on this below).
Image

If unstable nodes and DOF’s are listed, these can be double-clicked to find their location in the Solver model. This can give some clues about the location and nature of buckling. In the example below, buckling is causing analysis failure - and so Errors - for a combination and Warnings for some load cases.
Image

Image

Run Buckling Analysis
Buckling analysis is a ‘modal’ analysis. As such it is highly analogous to Vibration Analysis, which is now actually now termed 'Modal' Analysis in TSD. Just like Vibration Analysis, Buckling Analysis gives Mode Shapes (as discussed above) which can be graphically represented to show the behaviour. Each mode will have its associated buckling factor (again as discussed above) which is the factor of the load case/ combination you have subjected to analysis at which the mode occurs. These are the only results that Buckling Analysis yields: Mode shapes and their factors.
A much better idea of the location and nature of buckling (than just locating reported unstable nodes) can be found by running 2nd Order Buckling Analysis directly (as the Analysis Error/Warning tooltip suggests) via the Analyze ribbon as shown in the picture below.
Image

There are some settings for this analysis type which are accessed via Analyze > Settings > 2nd Order Buckling. In most cases these can be left as the default values.
Image

Please note the following:
- Do not attempt to run buckling analysis for all cases and combinations! Consider:
- Buckling analysis is an iterative process and so - depending on the model size - can take some time to complete.
- If buckling occurs for a load case, then it will also occur for all combinations which include that case (with a factor ≥ 1.0). Hence is is usually a waste of time running buckling analysis for such combinations.
- Remember - the point of running buckling analysis in this context is to find and resolve buckling issues so that 2nd order static analysis will solve with no errors or warnings, and design can then be accomplished. So it is just a means to this end.
- So logically you need only to run it for the minimum number of cases/ combinations required to diagnose and resolve buckling issues.
- Buckling analysis is not a design ‘check’ as such, or something that is required regularly:
- For buildings, the Sway/ Drift checks are the mandatory checks for overall structure stability that are required and that are automatically performed by TSD. For more on these see the help and TUA articles The sway check, The drift check and Why does the Status tree Report a Design > Sway Warning?.
- In some less common circumstances Buckling Analysis might also be run as a form of check e.g. to find the analytical elastic critical buckling factor for a structure or part of a structure which is beyond the scope of design standard sway/drift and design checks. Further discussion of this point is beyond the scope of this article.
Viewing Buckling Modes
When buckling analysis is complete, only the two results discussed above are available; mode shapes and their associated factors. To view these:
- Just as for any other results, select the case/ combination you wish to view results for.
- Activate Total Displacements (usually these will already be active) for both 1D and 2D elements (the latter if you have 2D element meshes subject to significant compression forces that might be buckling).
- Select a Mode from the drop-list on the Ribbon and the buckled mode shape (at one extreme of amplitude) will then be displayed.
- For the best appreciation of the mode Animate the shape (right-click > Animate… as shown below).
- Remember: generally we are only interested in mode shapes with factors < 1, since these will be the ones causing analysis issues.
Selecting Modes and Animating Shapes
The brief video below shows how to do this (note that you can change the selected mode shape and case/ combination while Animation is active)
Image

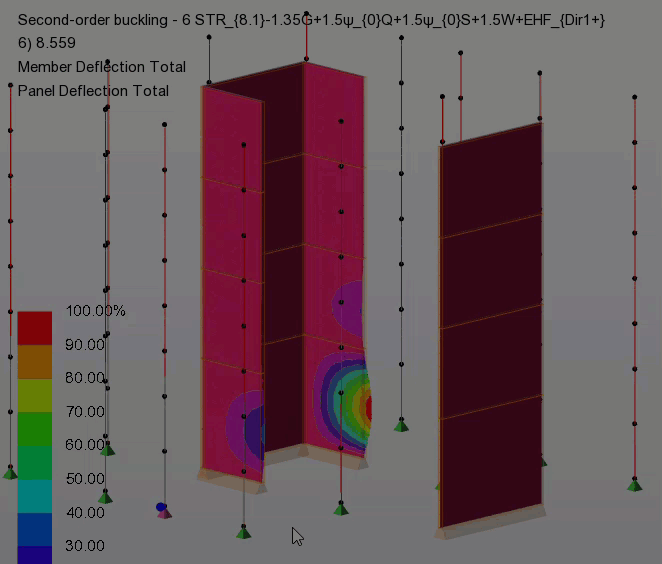
Sway buckling mode
The brief video below shows an example of this.
Image

Buckling of 2D element mesh
2D (FE) element meshes can buckle as well - the brief video below shows an example of this.
Image
Solution
Once you have identified the location(s) and nature of buckling, ultimately the solution is very simple - where buckling is preventing analysis solution or causing warnings, you must increase the stiffness of the buckling member(s) such that the lowest buckling mode factor of all cases and design combinations is > 1.
The engineer will be aware that there are many ways to increase stiffness - ranging from increasing section sizes to altering the structural form. The solution also depends on the nature and location of buckling. Hence we cannot give categorical advice.
- Tip - note that you need not be concerned about analytical buckling of braces or truss internals (i.e. members having either of these characteristics). This is because the ‘truss’ 1D element type is used for these in the analysis model. In this context the term truss does not mean the element type is intended only for trusses, but denotes a simple 1D element type which has only axial stiffness and so cannot buckle (and hence is often used to model truss members). See this Help topic for more on element types; Solver element (1D) types.
For strut buckling, the solution can be simply to increase the section size of the buckling member(s). For steel structures/ members, this can often be achieved automatically by running a “pre-design” for First order analysis such that all compression members pass the design checks (which will include strut buckling).
First Order analysis “Pre-design”
The elastic critical buckling load of a member will be generally always be > the design code buckling compression resistance (as slenderness increases the two will converge). The design code buckling compression resistance will include for such effects as; residual stresses, local imperfections and plastic yield. None of these are considered in theoretical elastic critical buckling. Providing the 2nd order magnification effects are not extreme (and good general advice is to limit these to ≤ 1.5x the first order forces), the section sizes so determined will often be adequate for 2nd order analysis. Hence our general advice is to always undertake such a first order analysis “pre-design” prior to attempting 2nd order analysis & design.
Situations where such a first order analysis “pre-design” may not result in sections that are adequate for 2nd order analysis are:
- Where the design effective length is not similar to that inherent in the analysis model. Examples of this are:
- Members such as rafters or trusses where purlins or secondary members - which would reduce the minor axis/ out of plane buckling length - are not modelled.
- Cantilever columns where the effective length factor has been left at 1.0 (see this TUA article for more discussion of effective length settings Eurocode Steel Design - When can an effective length factor of 1.0 be used? )
- For the US Head Code and the AISC Direct Analysis Method (DAM) which involves both reducing the stiffness of elements (to 80% by default) and multiplying the applied loads (for ASD design) in the 2nd order analysis.
- For concrete members since auto-design does not change section size and reinforcement has no effect on their analytical stiffness*.
- (*other than for slabs in Rigorous Slab Deflection Analysis)
Prevent out of plane instability factor
A remedy that can be used (for Steel, Cold Rolled/Formed, Timber and General material members) in this case is to check on the Prevent out of plane instability factor, which you will find in member properties as shown below. The minor axis inertia of the member is then multiplied by the factor (the value of which defaults to 20 - a sensible initial value) thus increasing its analytical buckling capacity. This occurs only in the 2nd order analysis . This behavour also applies to the pre-size sections assigned during Steel Auto-design using 2nd order analysis. Hence the setting can be used to assist when buckling problems occur in the 2nd Order analysis that is part of Steel Auto-design. The increased minor axis inertia is NOT used in design checks.
Image

Since this setting adds ‘artificial’ stiffness to the model, the engineer should take care to ensure that its use does not inappropriately increase the lateral stiffness of the structure as a whole leading to inaccurate results.
Sway Buckling
For sway buckling, increasing section sizes may not help and nor will performing a first order analysis “pre-design” in general, since code-based design stability checks are for the unrestrained lengths of individual members, not arrangements of members acting as a whole. The sway check / Drift check results should be reviewed (always we recommend) and can often highlight areas susceptible to sway buckling.
The solution in this case is to increase the sway (lateral) stiffness of the arrangement of members - or potentially the entire structure - in some manner. This could involve any of; adding bracing members, including some support stiffness, editing releases...etc. Again, this is the engineer’s decision to make and we cannot give categorical or model-specific advice.
For example, in the case of the sway buckling mode illustrated in the building above, the buckling members could be part of a canopy area over-layed only by a roof item which, by default, has no diaphragm action. A solution therefore could be to add some plan-bracing in the roof, or to activate the (semi-rigid) diaphragm option for the roof panel, thus tying it in with the adjacent floor diaphragm (of the slabbed area) where there is one.
Image
